
Outline
To integrate Acclaim Cloud Platform into your WordPress, we need the following items:
(1) Configure the ACP Plugin to talk to the image. We covered the settings of the plugin in Step 4. The only difference is that you need to tell your server’s plugin to point to the ACP image. specifically, you need to change
-Web settings
-Virtual Host Settings
-DB (and Mysql/mariadb) Settings – these need to point to the DB that your WordPress is using (leave DB slugs as none)
-Signup and Update Server ShortCodes may be filled later once you create those forms during this step (below)
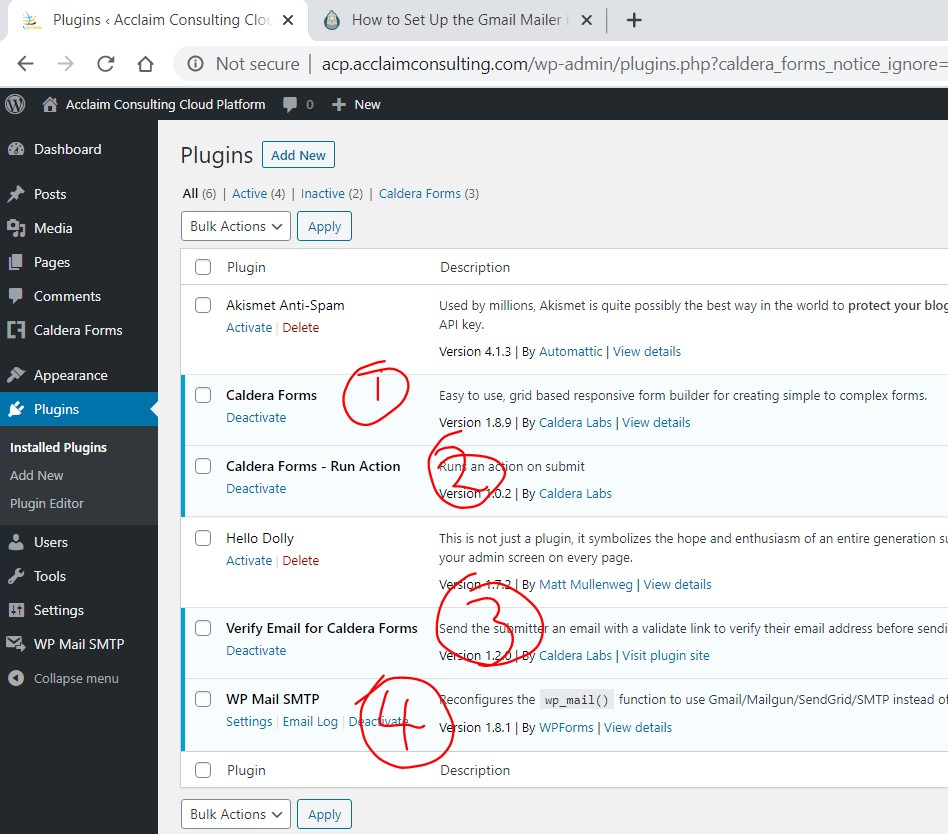
(1) Plugins & Plugin Configuration
-
- Caldera Forms
- Caldera Forms – Run Action
- Verify Email for Caldera Forms
- The last two are considered “Add Ons” to main Caldera Forms plugin. They are not available on WordPress plugin store, and must be installed from Caldera Labs site
- At the time of development, they were freely available from WordPress, but have since been monetized
- We have bundled the free versions with the image for testing purposes
- You may purchase the Add-ons from Caldera or upgrade to our plugin Pro Version that includes them.
- Any plugin that can send mail – depends on your email provider. For Gmail, you may use WP Mail SMTP.
- Test the mail plugin to ensure it can send mails before proceeding
(2) Server Management Pages
- Sign Up Page
- Login Page
- Quickstart Help Page
- Dashboard Page
- Error Page
- Set Password Page
(3) Theme Changes
To create the menus for the server management dashboard, you need to make some changes to your WordPress theme.
Note: As you go through these configurations, use the ACP Image as a reference because all these items have been configured in the ACP Image.
Plugins & Plugin Configuration
Add the plugins listed above.
Do not proceed until all the plugins are installed and activated, and SMTP email is successfully tested.
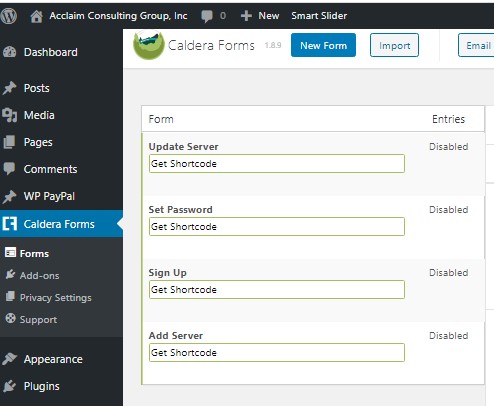
- Add the following forms using the Caldera Forms plugin
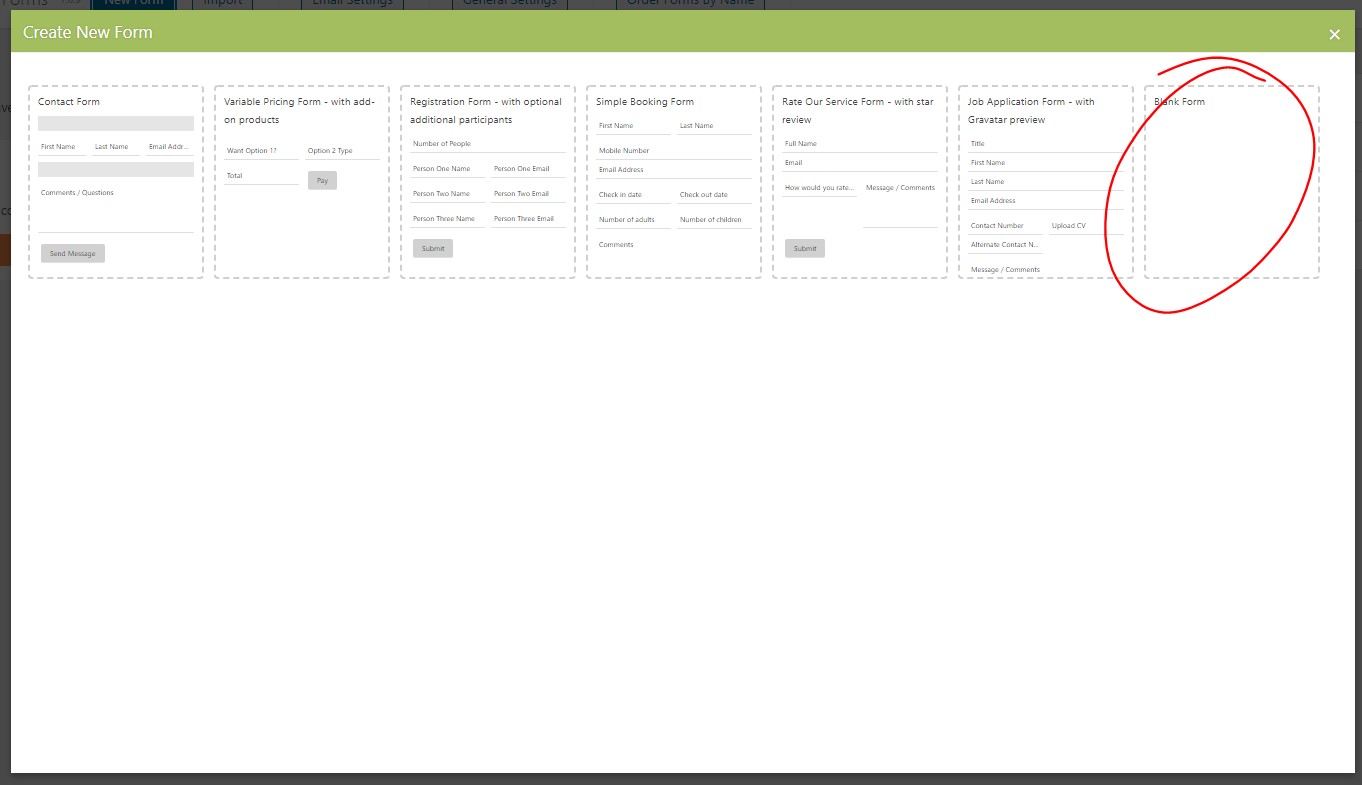
- It is easiest to use the Blank Forms template
- Add Server Form
- Form Name: Add Server
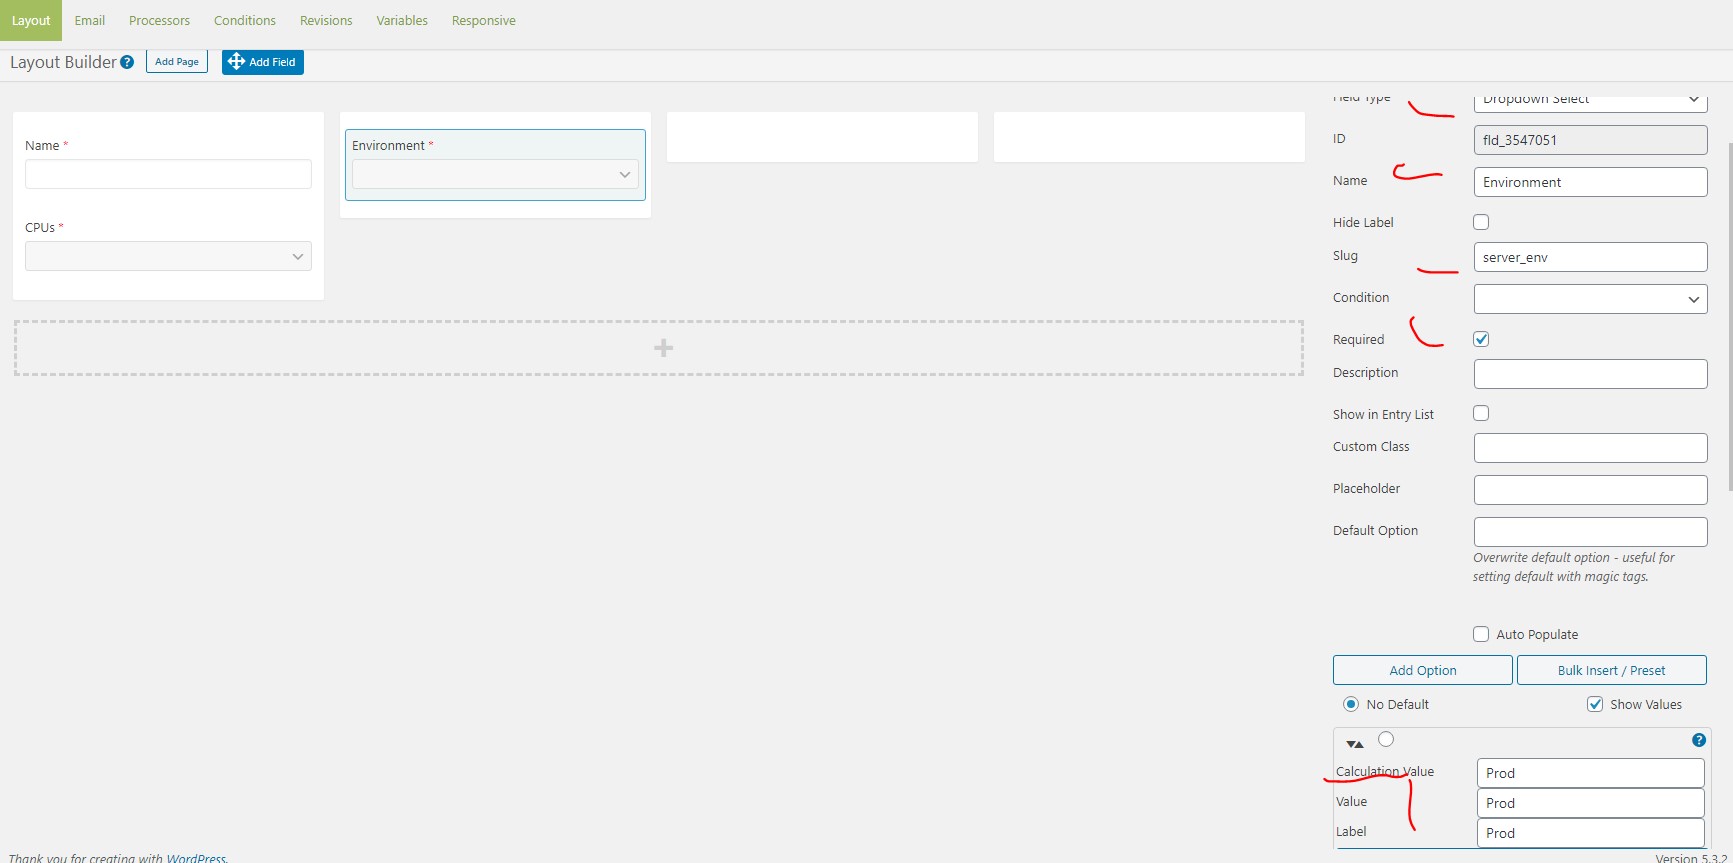
- Split Screen into 4 columns
- Under Layout tab, add the Fields
- Name:
- Field Type: Basic Single Line Text
- Name: Name
- Slug: server_name
- Required: Checked

- CPUS:
- Field Type: Dropdown Select
- Name: CPUs
- Slug: server_cpus
- Required: Selected
- Add Option (select Show Values), then add
- Calculation Value: 1
- Value: 1
- Label: 1
- Repeat Add Option for
- Calculation Value: 2
- Value: 2
- Label: 2
- Repeat Add Option for
- Calculation Value: 3
- Value: 3
- Label: 3
- Repeat Add Option for
- Calculation Value: 4
- Value: 4
- Label: 4
- Save Form
- Name:

- Environment
- Field Type: Dropdown Select
- Name: Environment
- Slug: server_env
- Required: Checked
- Add Option (select Show Values), then add
- Calculation Value: Prod
- Value: Prod
- Label: Prod
- Repeat Add Option for
- Calculation Value: Dev
- Value: Dev
- Label: Dev
- Repeat Add Option for
- Calculation Value: QA
- Value: QA
- Label: QA
- Repeat Add Option for
- Calculation Value: Sandbox
- Value: Sandbox
- Label: Sandbox
- Repeat Add Option for
- Calculation Value: Other
- Value: Other
- Label: Other
- Save Form
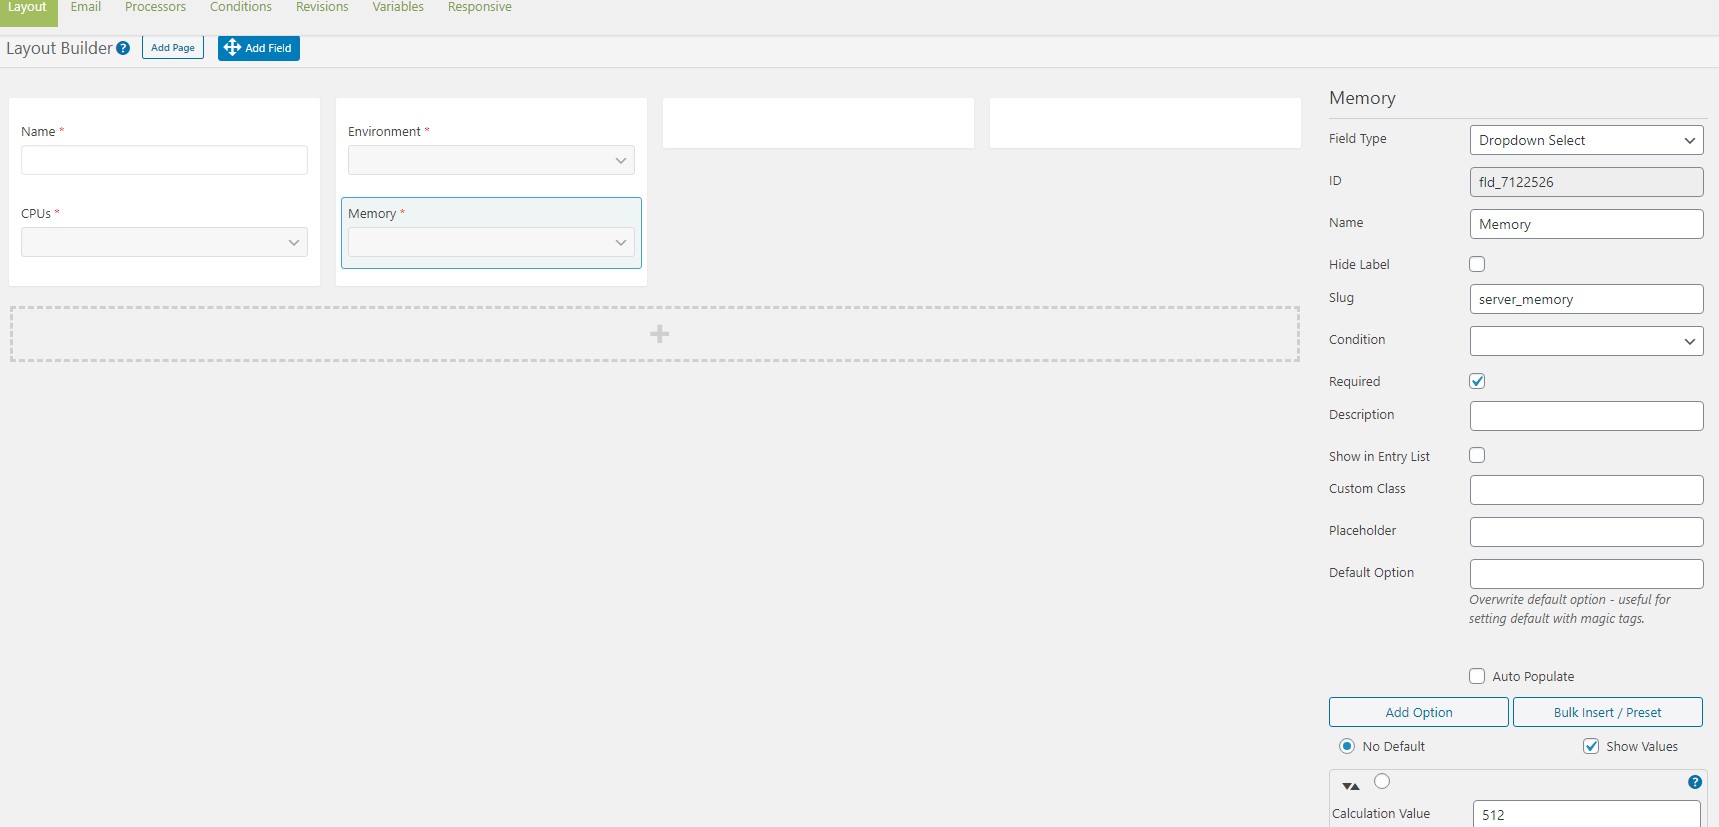
- Memory
- Field Type: Dropdown Select
- Name: Memory
- Slug: server_memory
- Required: Checked
- Add Option (select Show Values), then add
- Calculation Value: 512
- Value: 512
- Label: 512
- Repeat Add Option for
- Calculation Value: 1024
- Value: 1024
- Label: 1024
- Repeat Add Option for
- Calculation Value: 2048
- Value: 2048
- Label: 2048
- Repeat Add Option for
- Calculation Value: 4096
- Value: 4096
- Label: 4096
- Repeat Add Option for
- Calculation Value: 8192
- Value: 8192
- Label: 8192
- Repeat Add Option for
- Calculation Value: 16384
- Value: 16384
- Label: 16384
- Repeat Add Option for
- Calculation Value: 32768
- Value: 32768
- Label: 32768
- Save Form
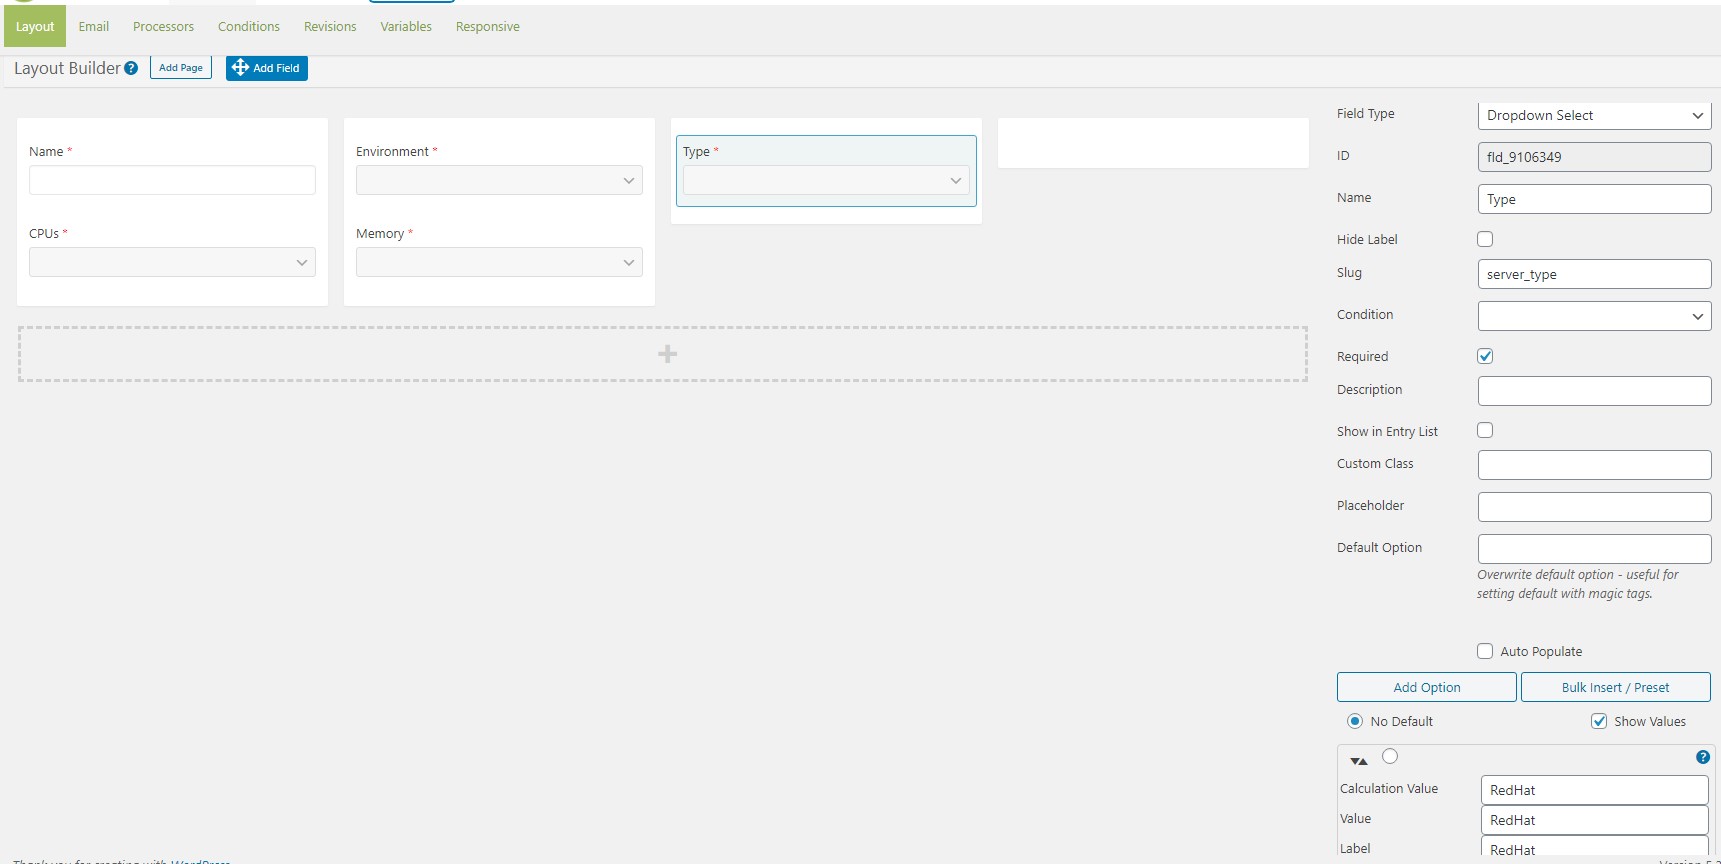
- Server Type
- Field Type: Dropdown Select
- Name: Type
- Slug: server_type
- Required: Checked
- Add Option (select Show Values), then add
- Calculation Value: RedHat
- Value: RedHat
- Label: RedHat
- Repeat Add Option for
- Calculation Value: Fedora
- Value: Fedora
- Label: Fedora
- Repeat Add Option for
- Calculation Value: Centos
- Value: Centos
- Label: Centos
- Repeat Add Option for
- Calculation Value: Ubuntu
- Value: Ubuntu
- Label: Ubuntu
- Repeat Add Option for
- Calculation Value: Debian
- Value: Debian
- Label: Debian
- Save Form
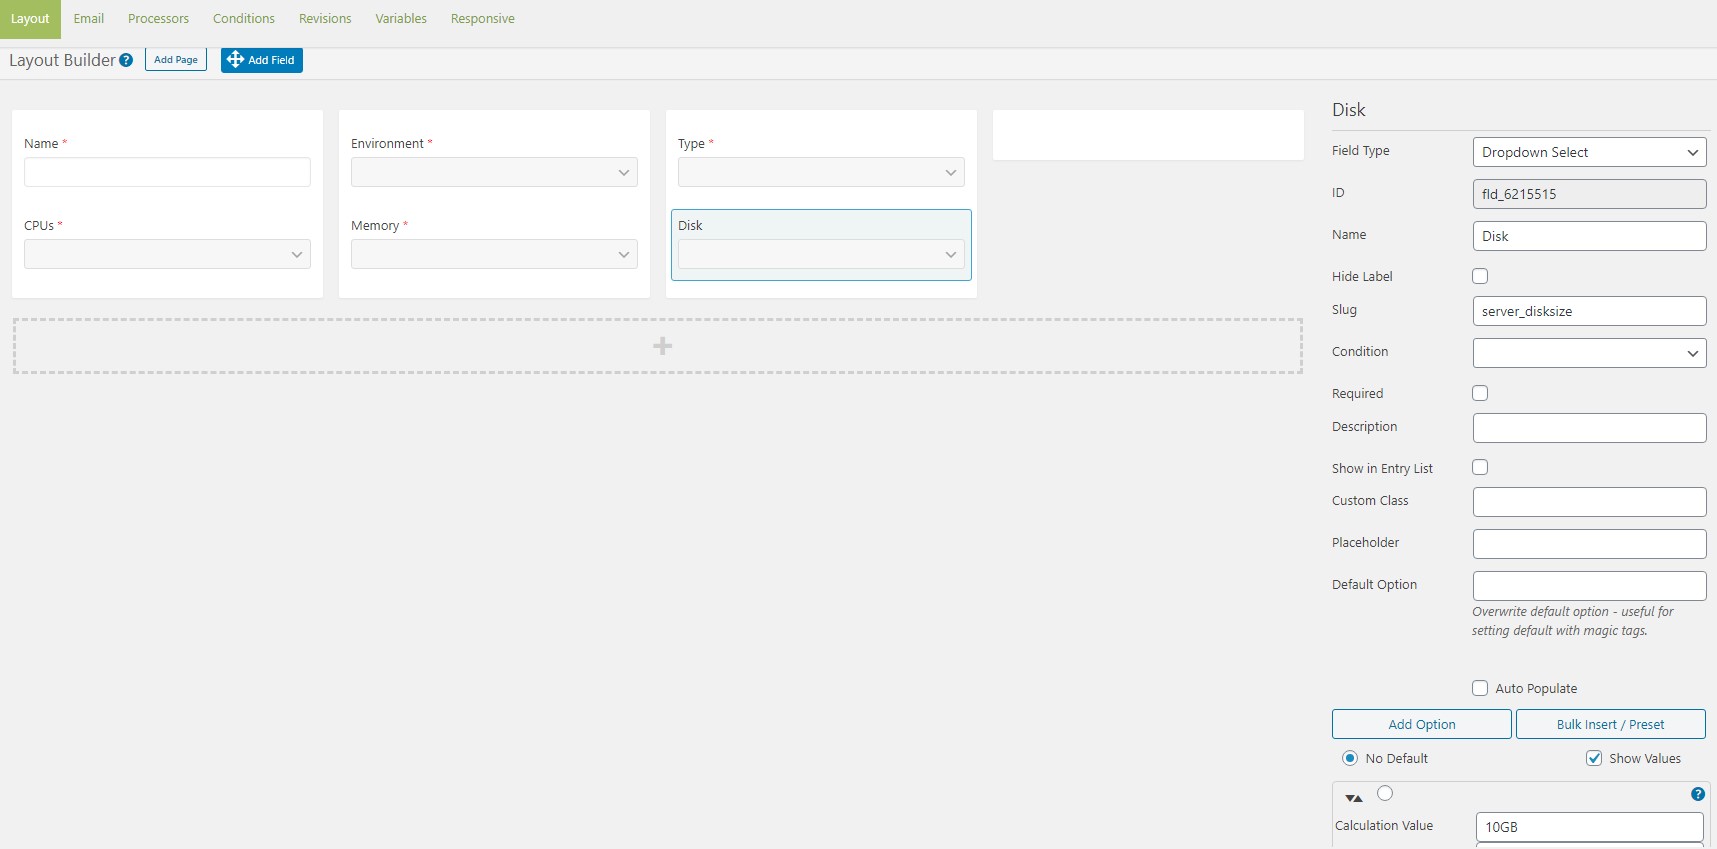
- Server Disk Size
- Field Type: Dropdown Select
- Name: Disk
- Slug: server_disksize
- Required: Checked
- Add Option (select Show Values), then add
- Calculation Value: 10GB
- Value: 10GB
- Label: 10GB
- Repeat Add Option for
- Calculation Value: 20GB
- Value: 20GB
- Label: 20GB
- Repeat Add Option for
- Calculation Value: 50GB
- Value: 50GB
- Label: 50GB
- Repeat Add Option for
- Calculation Value: 100GB
- Value: 100GB
- Label: 100GB
- Save Form
- Meta Data:
- Field Type: Basic Single Line Text
- Name: Meta Data
- Slug: server_meta
- Required: Checked
- Save Form

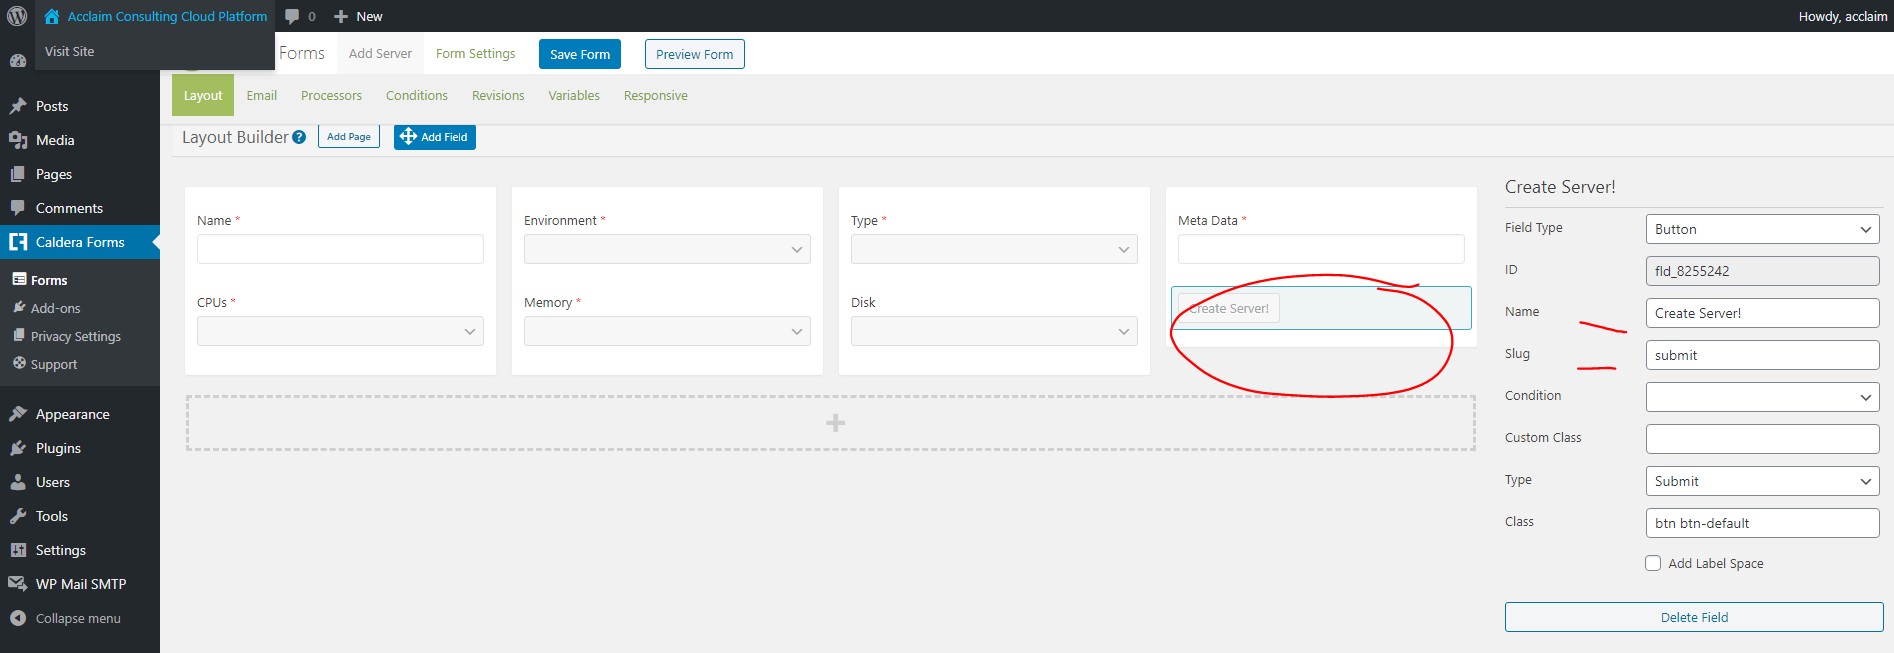
- Create Add Server Submit Button
- Field Type: Basic Button
- Name: Create Server!
- Slug: submit
- Save Form
- Under Email Tab, disable Mailer
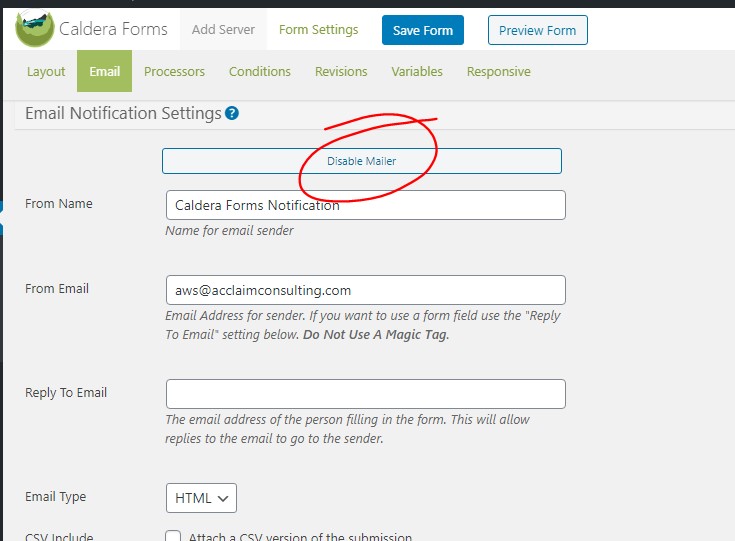
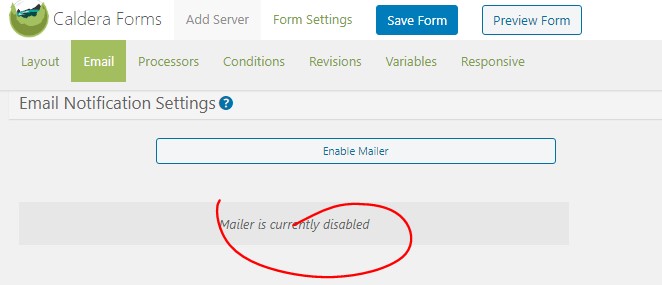
- Save form
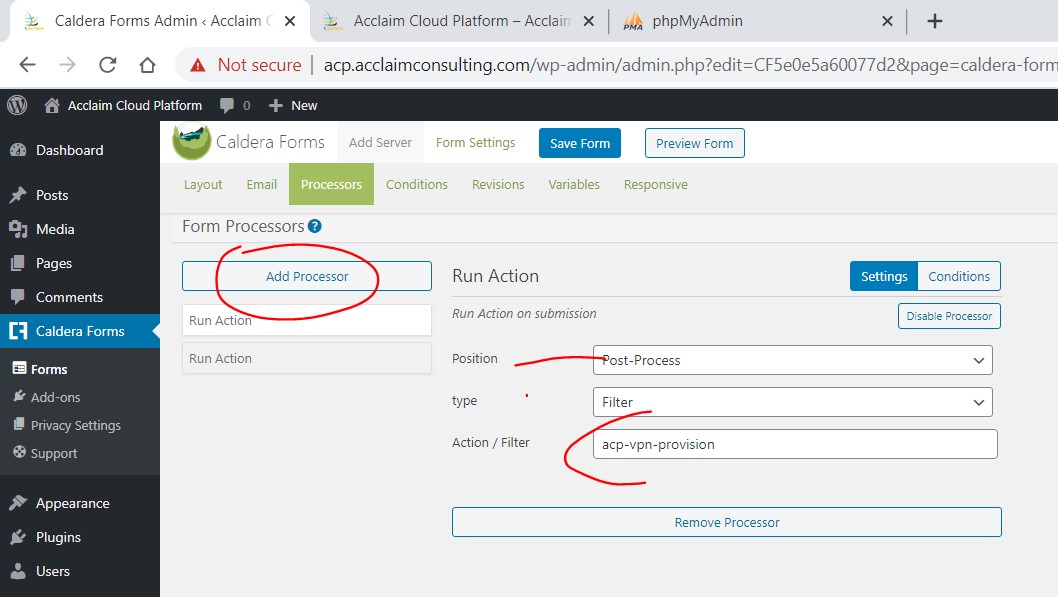
- Under Processors tab, add two Run processors

- VPN Run Processor
- Position: Post-Process
- Type: Filter
- Action / Filter: acp-vpn-provision
- Save Form
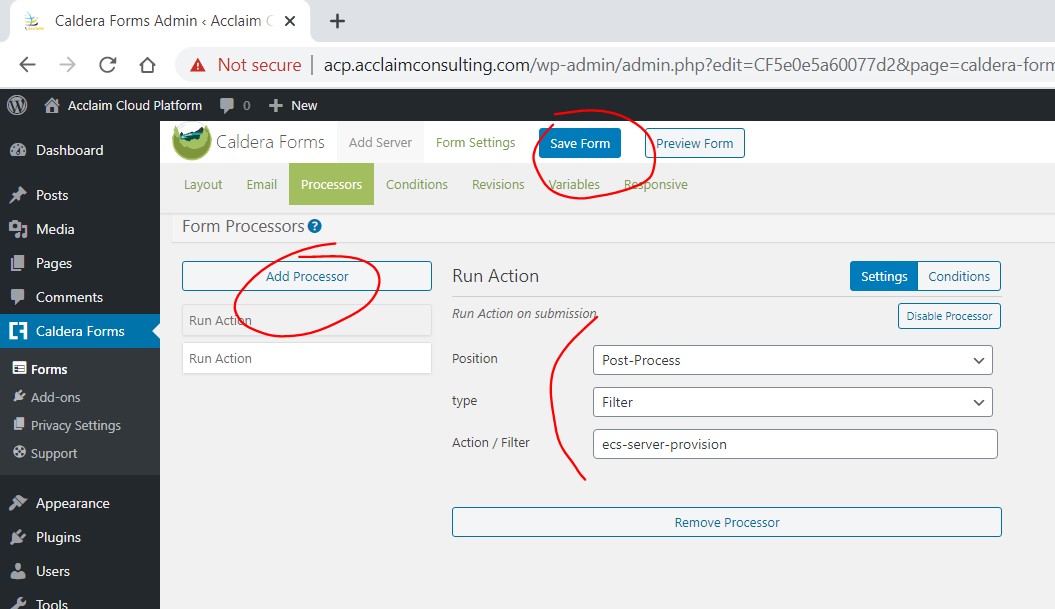
- Server Provision Processor
- Position: Post-Process
- Type: Filter
- Action / Filter: acp-server-provision
- Save Form
- No changes are required on Conditions, Revisions, Variables or Responsive tab.
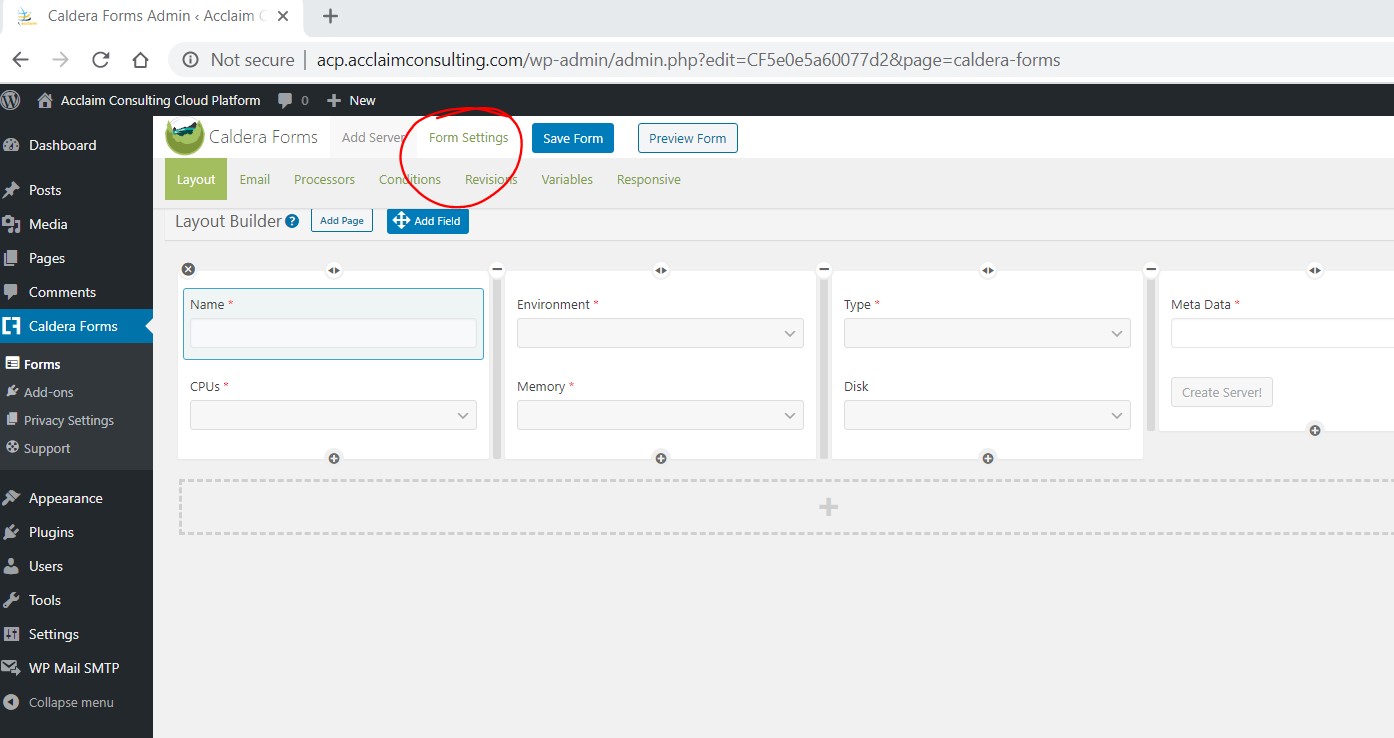
- Click on Form Settings
- Set/Change Success Message
- Server Provisioning in Progress. It should take only a few minutes. Refresh Page for Status.
- Set Capture Entries
- Disable
- Leave rest as default
- Save Form
- Final Form should be/look as follows

- Update Server Form
- Best way to go about it is to clone the Add Server Form (mouse over Add Server Form, then select ‘Clone’)

-
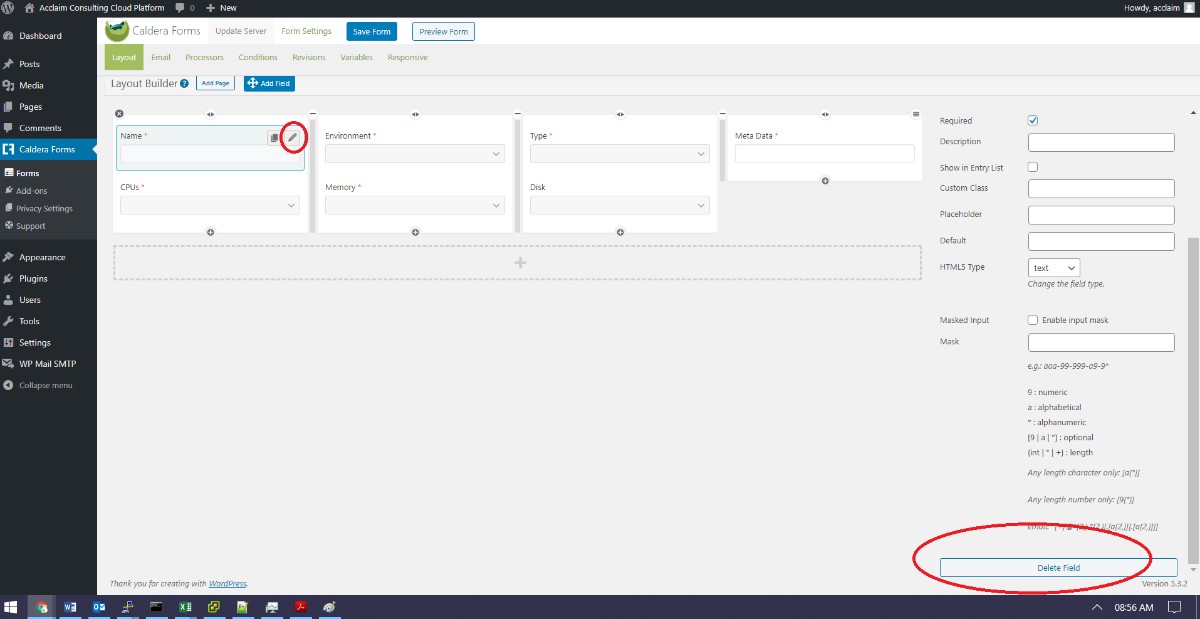
- Remove the following fields by clicking on Edit icon and Deleting the field on at bottom right
- Name
- Environment
- Remove the following fields by clicking on Edit icon and Deleting the field on at bottom right
- Type
- Save Form
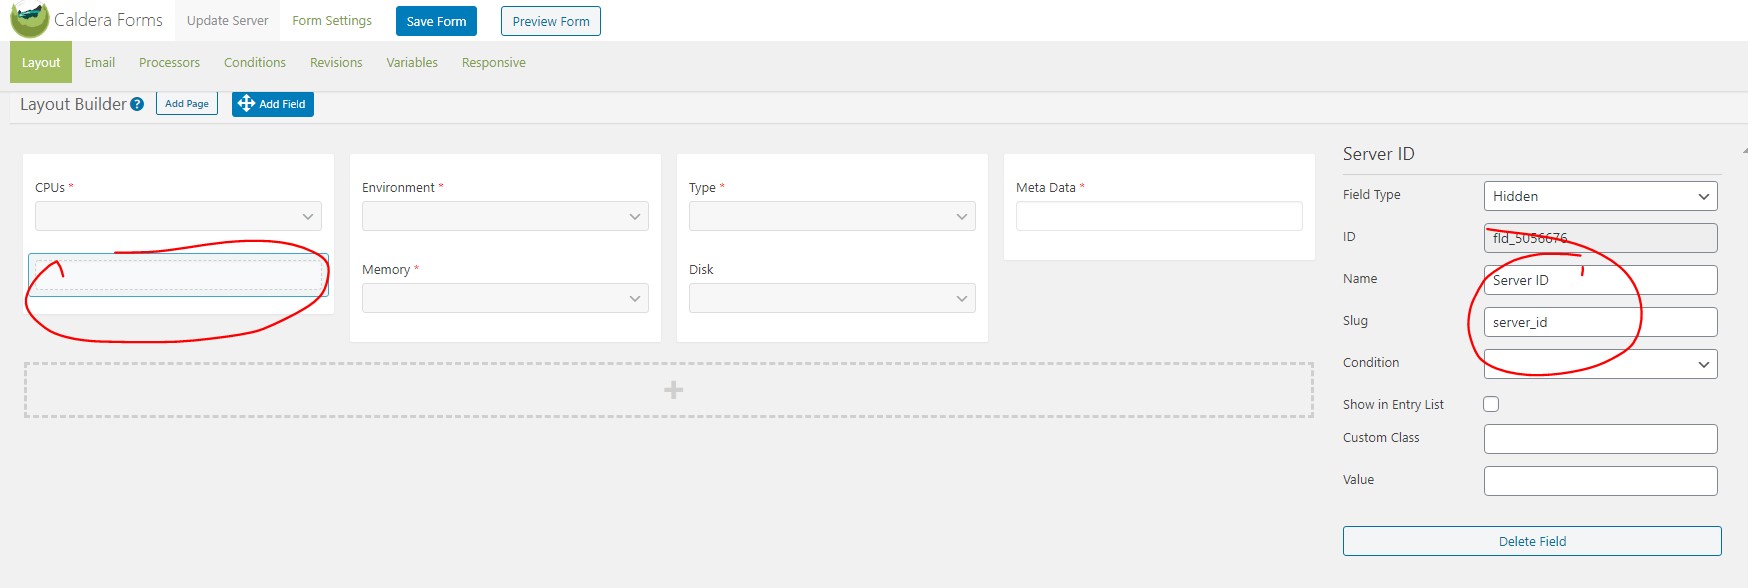
- Add a hidden field for server_id
- Field Type: Hidden
- Name: Server ID
- Slug: server_id
- Save Form
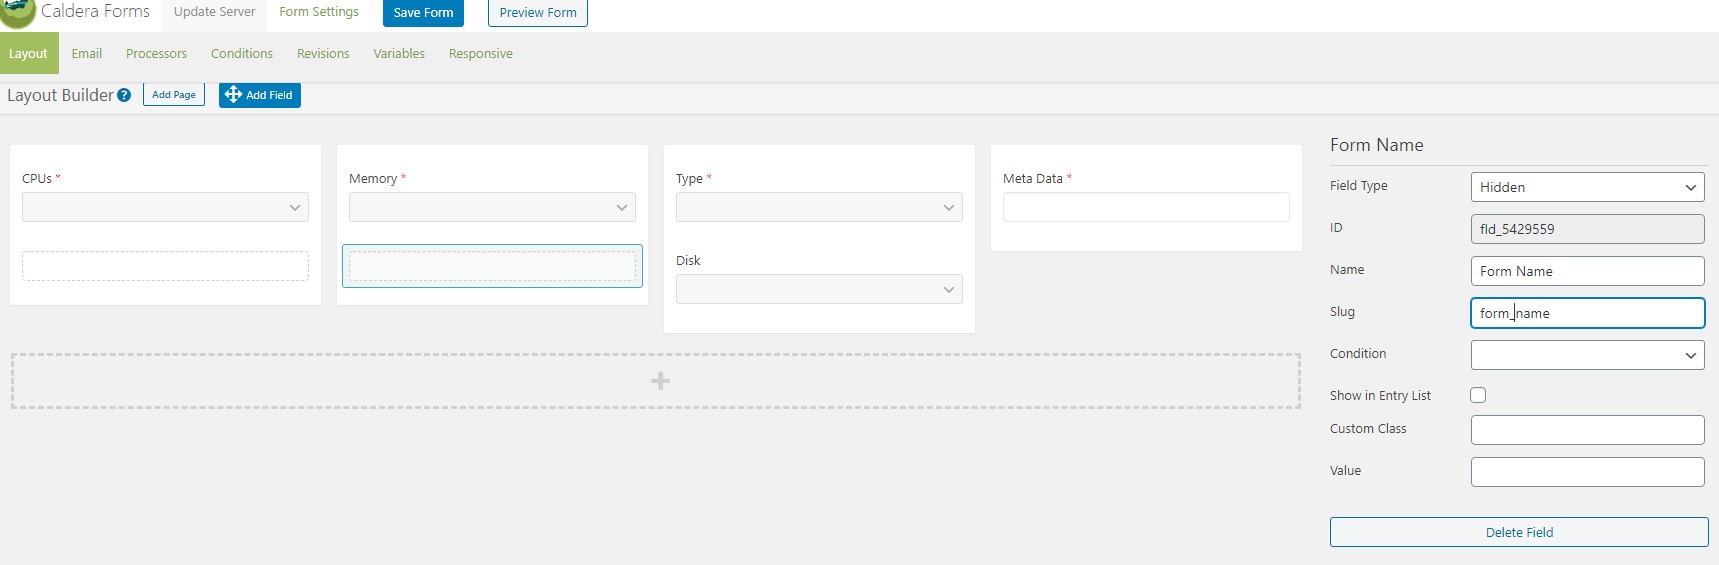
- Add Another hidden field below Memory
- Field Type: Hidden
- Name: Form Name
- Slug: form_name
- Save Form
- Add a HTML field under Disk
- Content à HTML
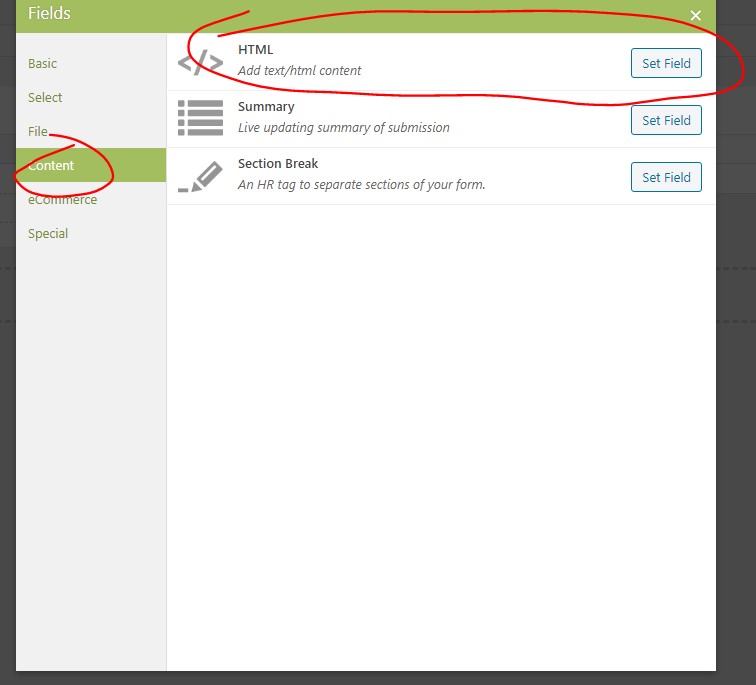
-
- Field Type: HTML
- Name: info
- Slug: info
- Text area: *shrinking disk size not supported
- Save Form

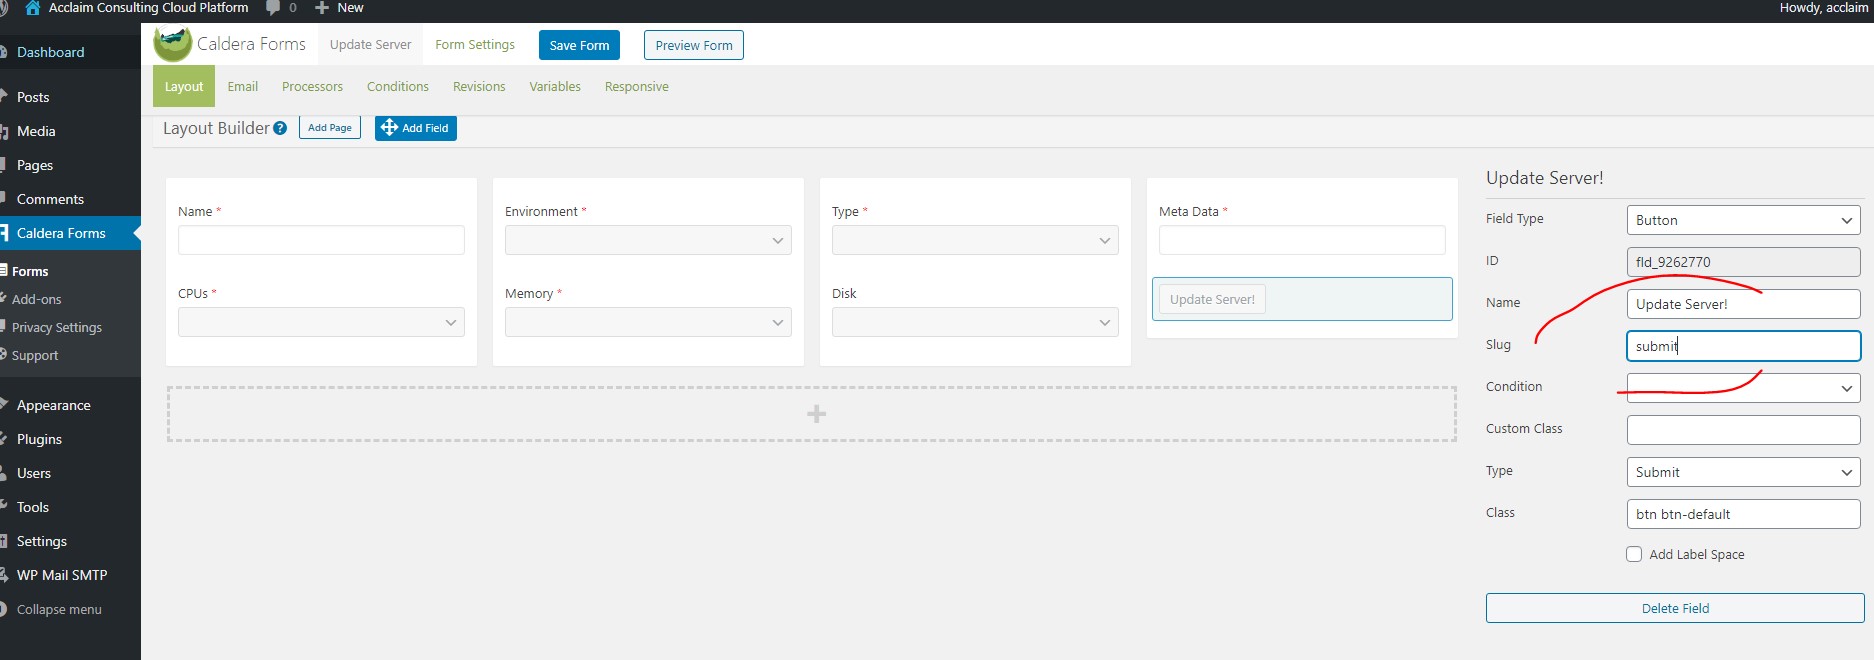
- Edit the Submit Button
- Name: Update Server!
- Save Form.
- Under Email Tab, disable Mailer
- Save form
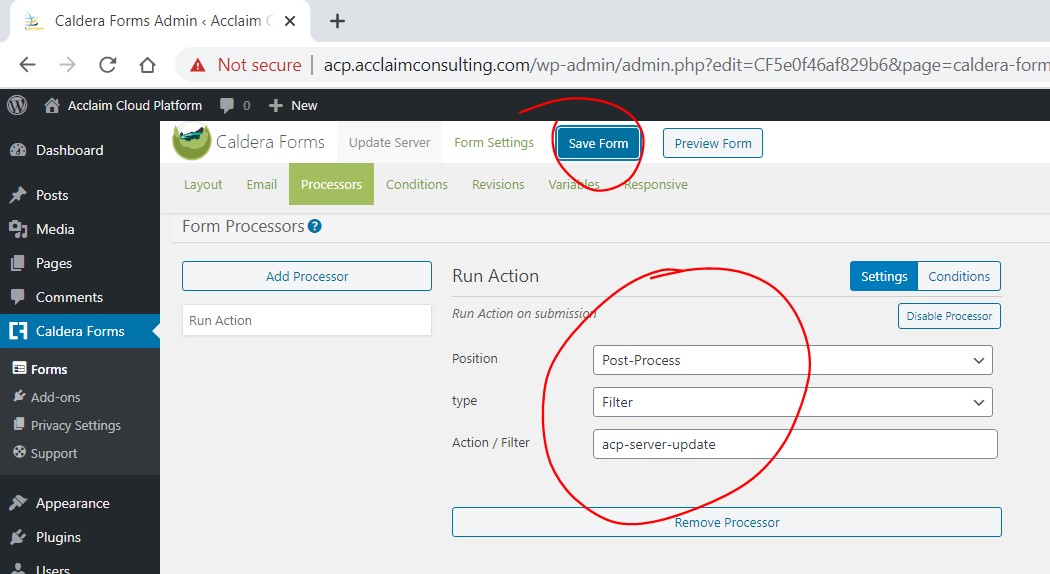
- If you cloned the form from Add Server form, there will be two Run processors under Processors tab. Delete one and update the remaining one (other create one as follows)
- VPN Run Processor
- Position: Post-Process
- Type: Filter
- Action / Filter: acp-server-update
- Save Form
- No changes are required on Conditions, Revisions, Variables or Responsive tab.
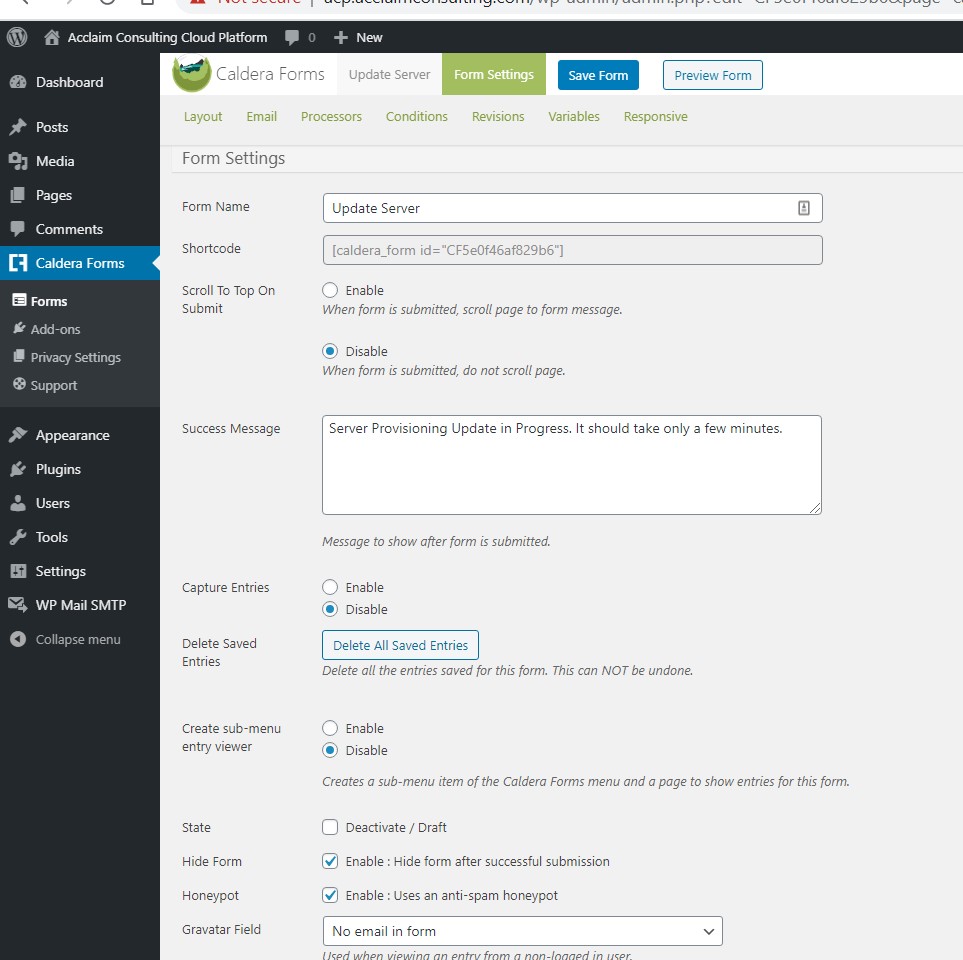
- Click on Form Settings
- Set/Change Success Message
- Server Provisioning Update in Progress. It should take only a few minutes.
- Set Capture Entries
- Disable
- Set/Change Success Message
- Leave rest as default
- Save Form
- Final Form should be/look as follows
- Signup Form
- Form Name: Sign Up
- Split Screen into 2 columns
- Under Layout tab, add the Fields
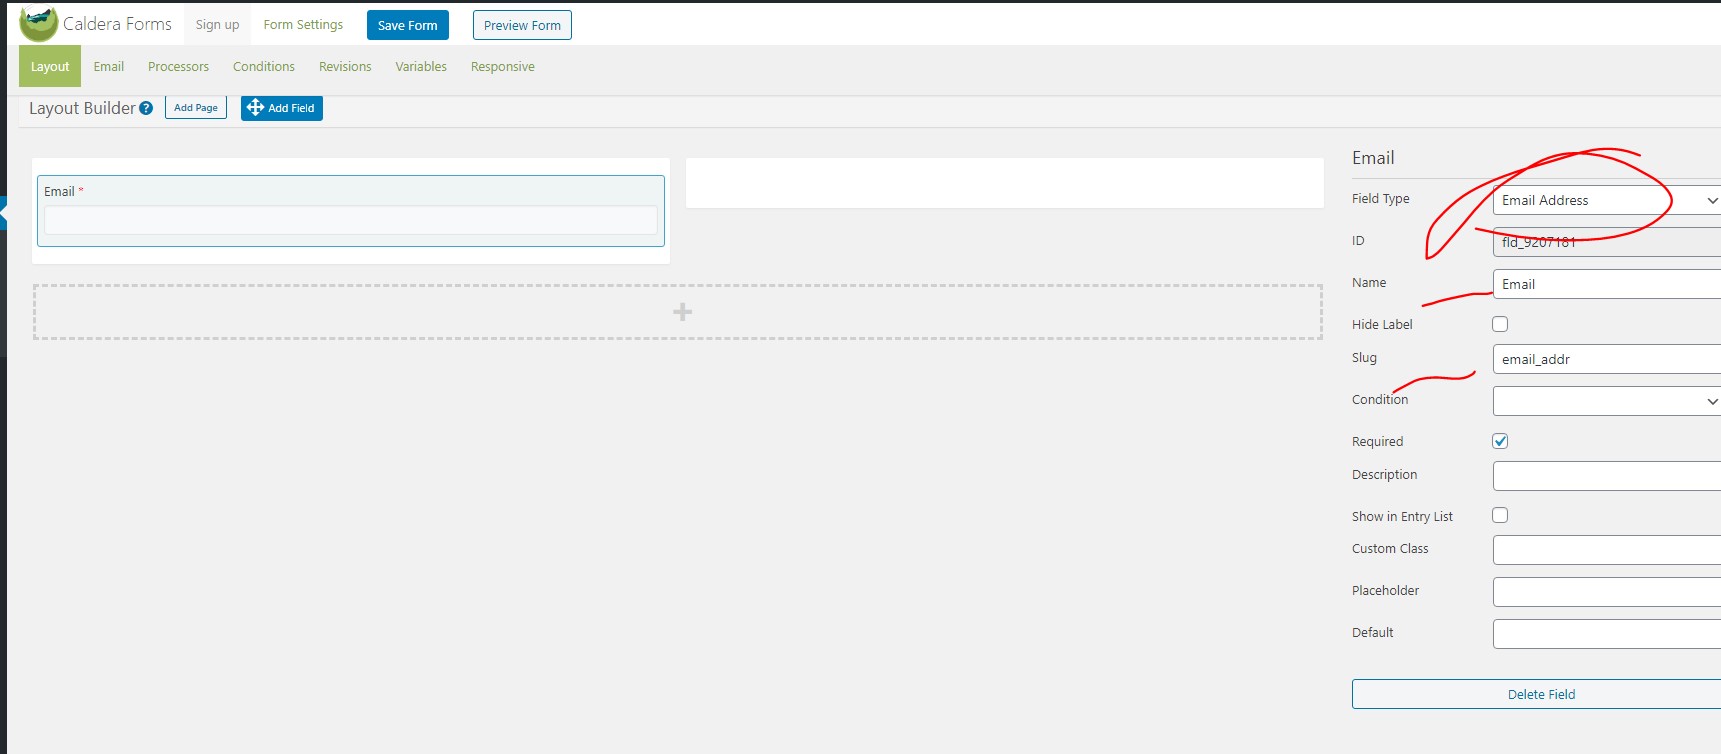
- Email:
- Field Type: Email Address
- Name: Email
- Slug: email_addr
- Required: Checked
- Save Form
- Email:
- Signup Button
- Field Type: Button
- Name: Sign Up
- Slug: sign_up
- Save Form
- Goal
- Field Type: Dropdown Select
- Name: Goal
- Slug: goal
- Add the following options (values may be changed to suit your business)
- Development
- Migration
- DIY
- Unsure/Don’t Know
- Save Form
- Under Email Tab, disable Mailer
- Save Form
- Under Processors tab, add two Run processors
- Validate Email Processor (Use the following settings)

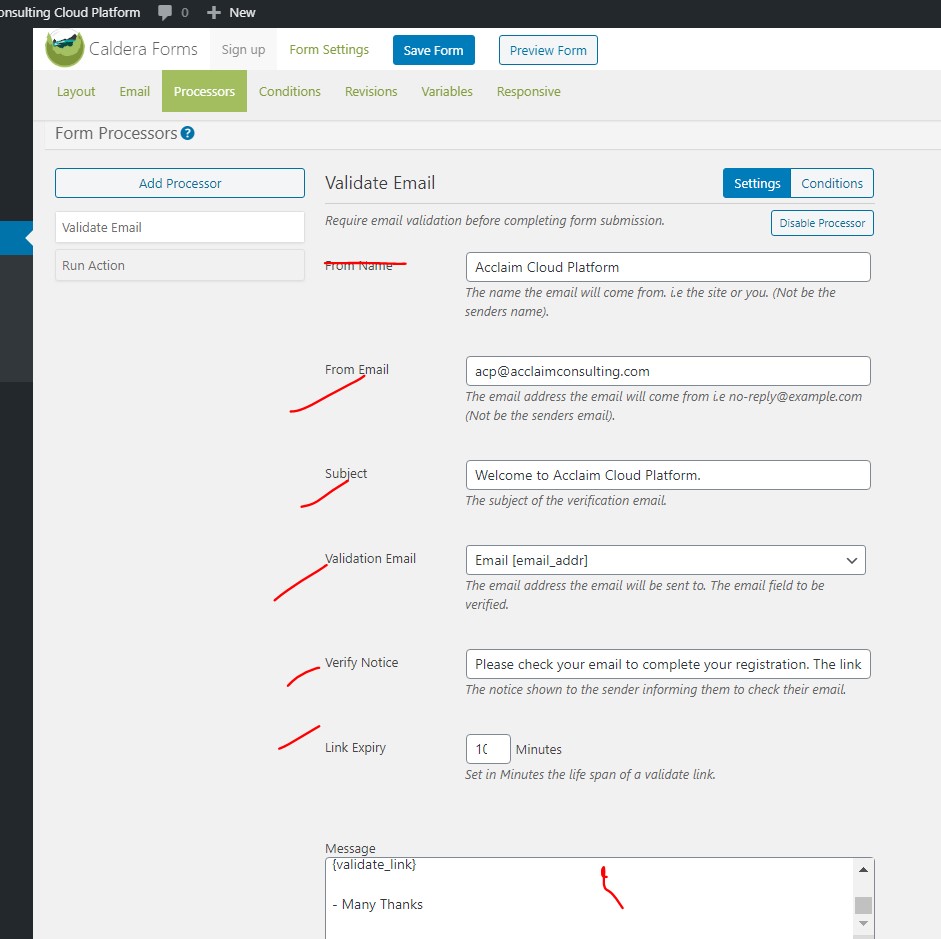
- From Name: Enter the Name from which email validations will come from, e.g. Acclaim Cloud Platform
- From Email: Enter the email from which email validations will come from, e.g. Acclaim Cloud Platform, e.g. acp@acclaimconsulting.com
- Subject: Subject of Email, e.g. “Welcome to Acclaim Cloud Platform.”
- Validation Email: Default
- Verify Notice: This is the confirmation message to user upon registration, e.g. “Please check your email to complete your registration. The link expires after 10 minutes.”
- Link Expiry: Set to 10 mins
- Message: (words may be changed to suit, e.g: “”
Hi %email_addr%,
Your journey to a better cloud experience has begun. Please click the link below to verify your email address:
{validate_link}
– Many Thanks
-The Acclaim Cloud Platform Team
- Save Form
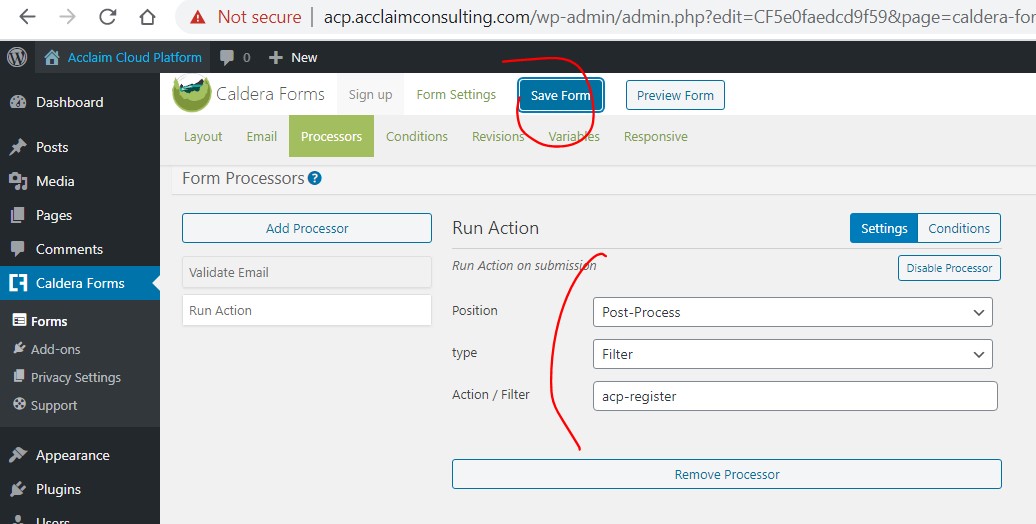
- Register Run Processor
- Position: Post-Process
- Type: Filter
- Action / Filter: acp-register
- Save Form
- Click on Form Settings
- Set/Change Success Message (May be customized)
- Form has been successfully submitted! Thank you
- Set Capture Entries
- Disable
- Set/Change Success Message (May be customized)
- Leave rest as default
- Save Form
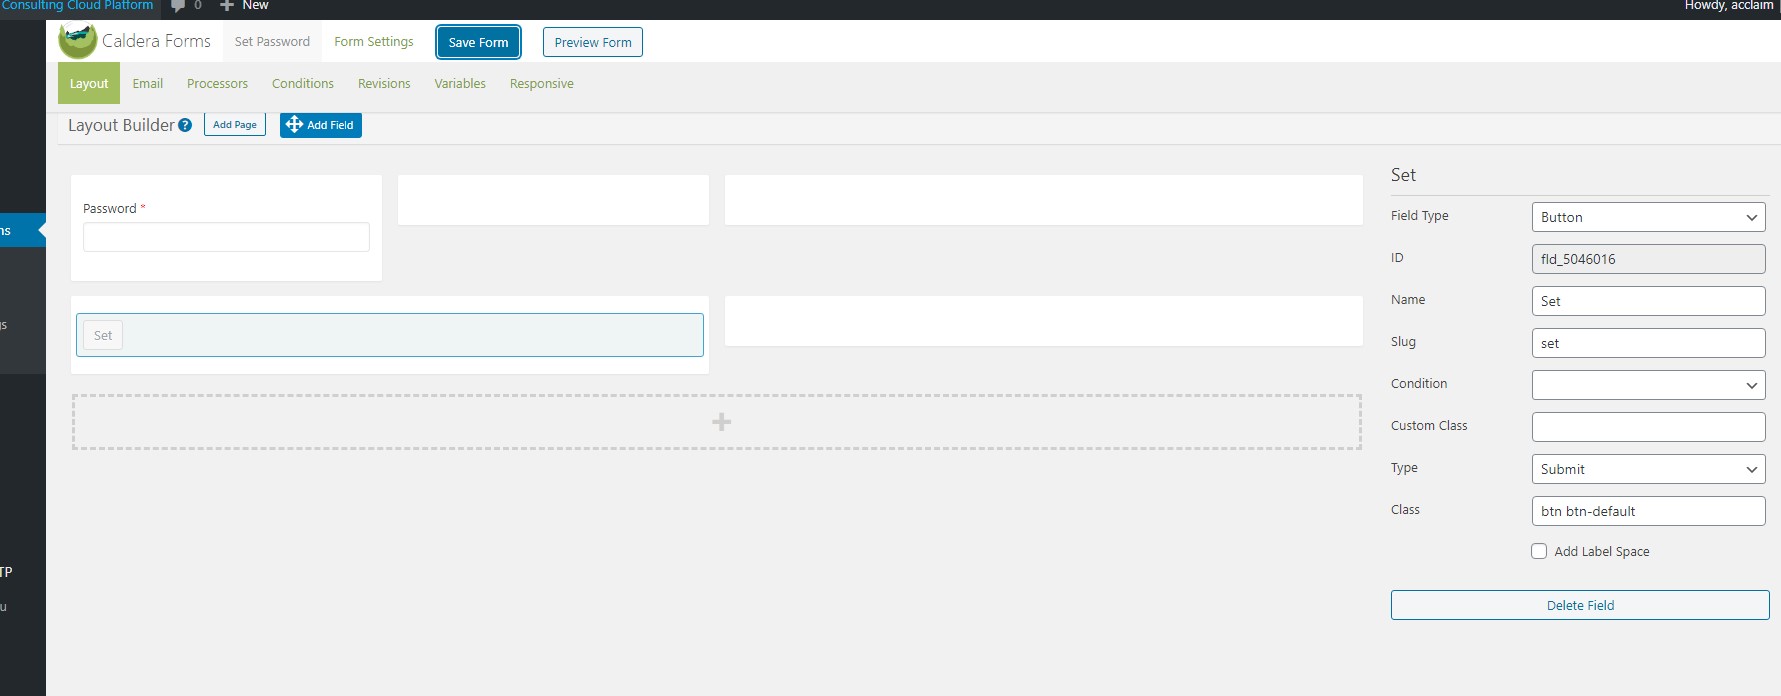
- Set Password Form
- Form Name: Sign Up
- Split Screen into 3 columns, two rows
- First Row: start with 2 columns, then divide the left one into two
- Second Row: Click the big ‘+’ at the bottom to add row, the split it into two
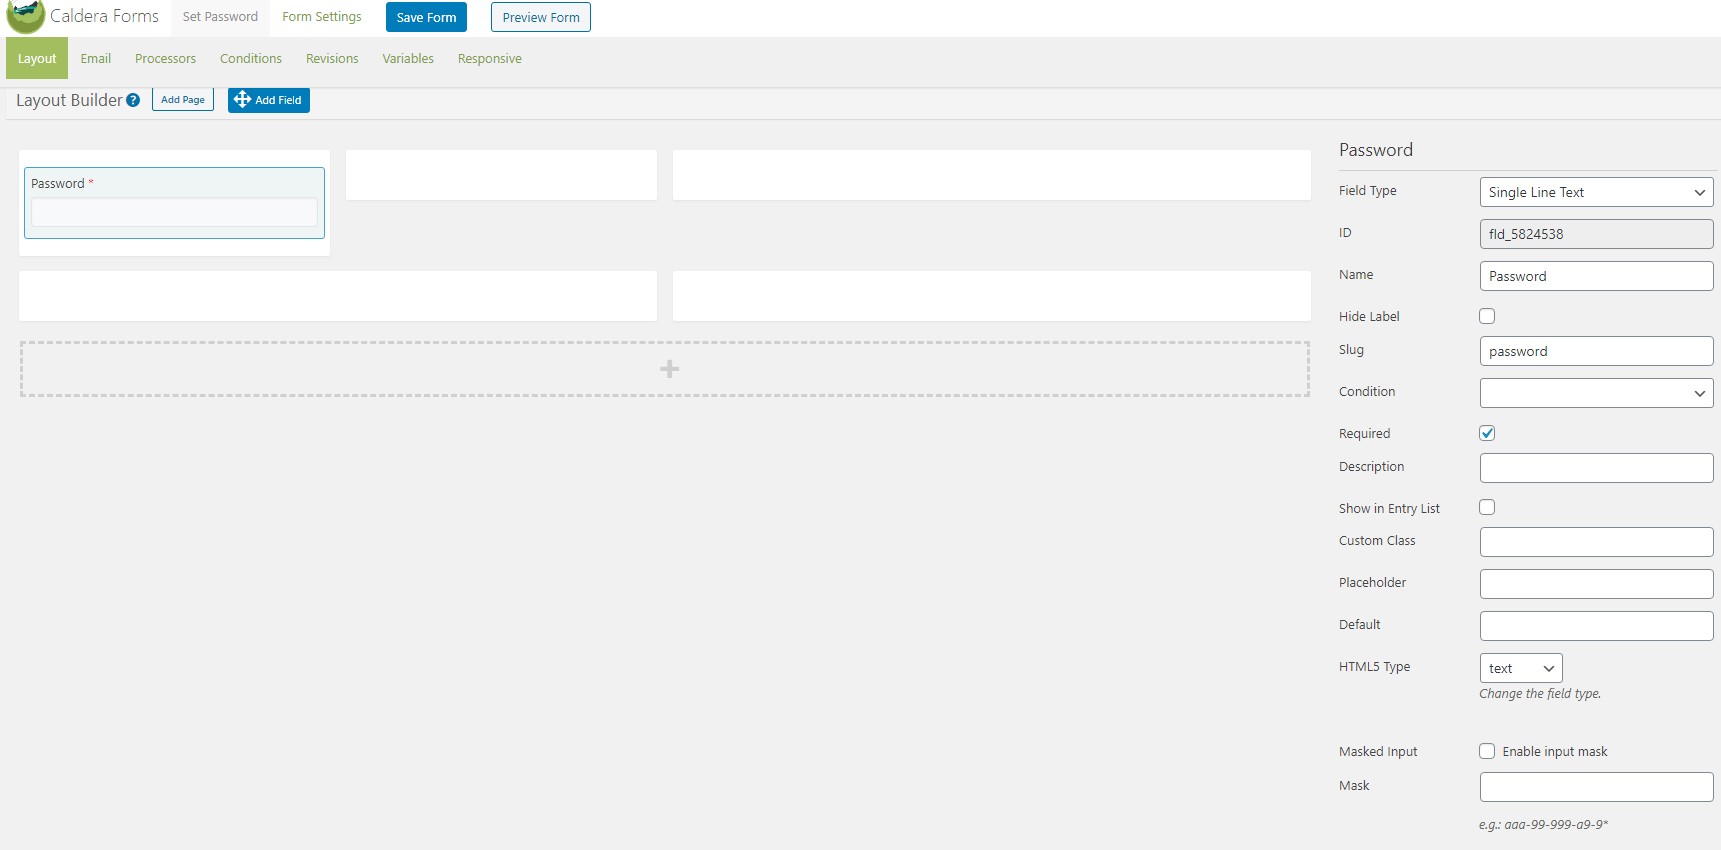
- Under Layout tab, add the Fields
- Email:
- Field Type: Single Line Text
- Name: Password
- Slug: password
- Required: Checked
- Save Form
- Email:
- Set Button (second row)
- Field Type: Button
- Name: Set
- Slug: set
- Save Form
- Under Email Tab, disable Mailer
- Save Form
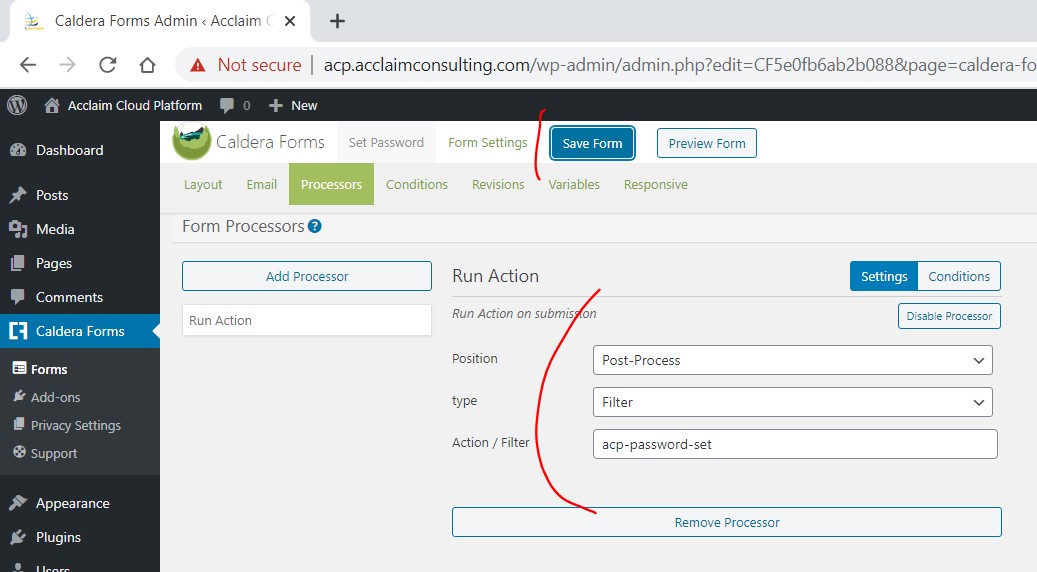
- Under Processors tab, add one Run processors
- Register Run Processor
- Position: Post-Process
- Type: Filter
- Action / Filter: acp-password-set
- Save Form
- Register Run Processor
- Click on Form Settings
- Set/Change Success Message (May be customized)
- Success! Please login with the new password.
- Set Capture Entries
- Disable
- Set/Change Success Message (May be customized)
- Leave rest as default
- Save Form
Server Management Pages
These are simple pages required for Server Management.
Note: Page Names must match exactly, otherwise the plugin will not be able to find them
They include
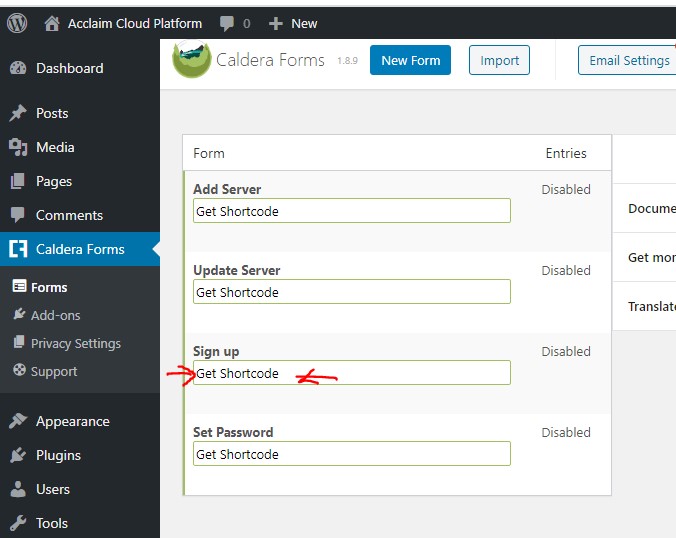
- Sign Up Page
- We first need to copy the Sign Up Form Short code under Caldera Forms: Click on ‘Get Shortcode’ then copy it to clipboard.
- The Add New Page
- Page Title: ACP Sign Up
- In WordPress 5.x with Block support, add a new block then search for shortcode
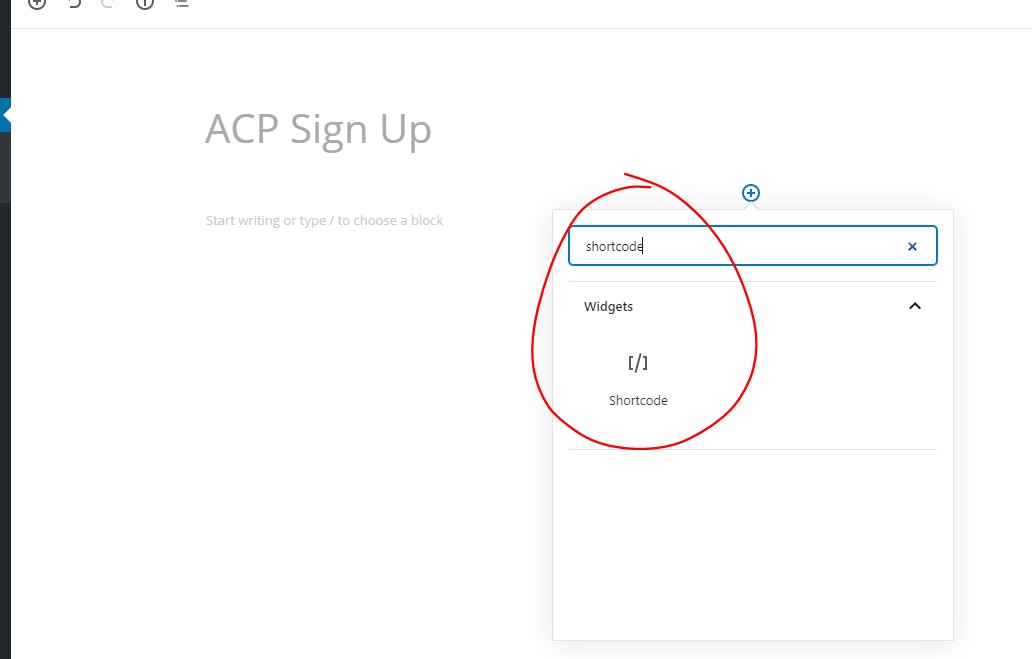
- Copy and Paste the signup short code from above
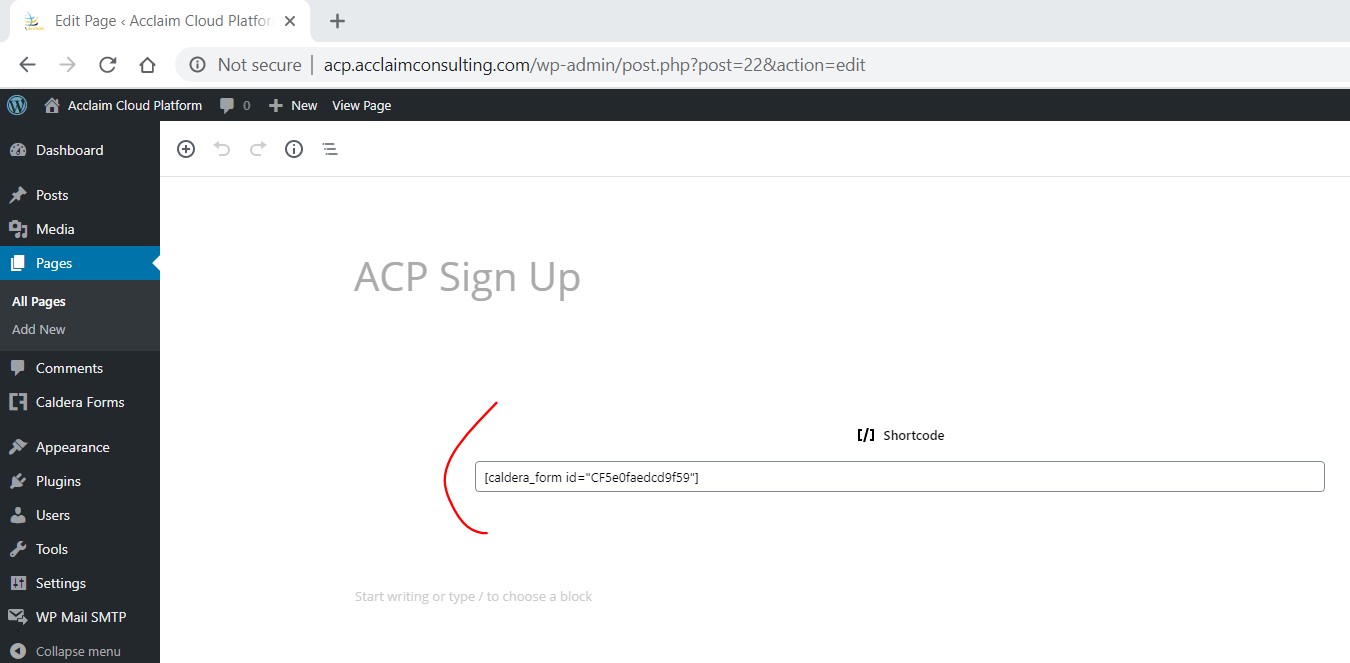
- Publish Page
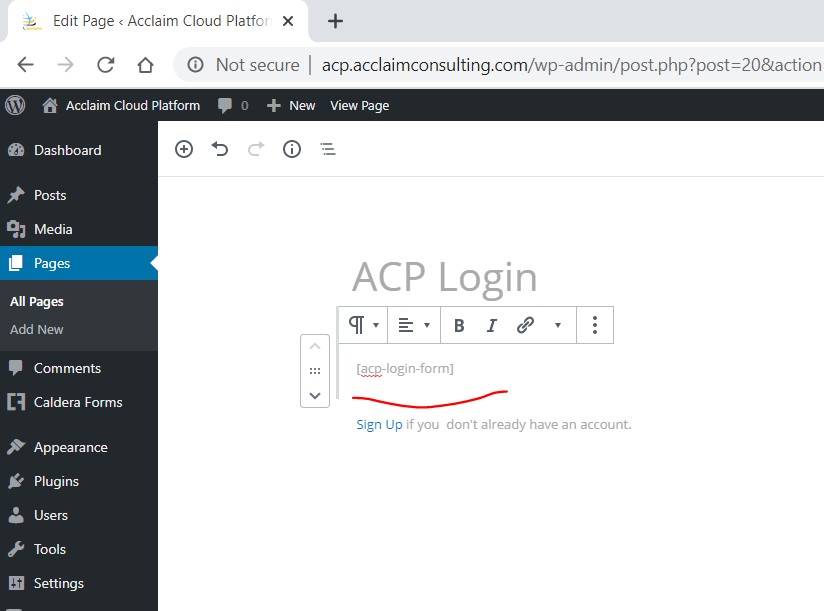
- Login Page
- Create aWordPress page and include the following short code:
- Page Title: ACP Login
- Also include a link to the Sign Up Page
- Sign Upif you don’t already have an account.
- Publish Page
- Create aWordPress page and include the following short code:
- Quickstart Help Page
- Add New Page
- Title: ACP QuickStart
- Body:
- Wording may be changed to suit
- Download VPN Client points to openvpn client download
- Download VPN Files link must point to /?acp_f1=vpn on the website with ACP Plugin
- Add New Page
Here is our 5-Step Quick Start Guide:
Download VPN Client here. Install it.
Download your VPN Files here. Keep them safe as they contain your VPN certificates and keys.
Copy downloaded to VPN’s config folder (e.g. C:\Program Files\OpenVPN\config for Windows)
Connect your VPN (in Windows, it is on the bottom right tray).
Once VPN is connected, you may access your machine using IP using credentials listed next to machine.
Note: Public IPs are not available for non-Pro accounts
Note: A non-Pro Account is is fully functional and may be used for Production or Commercial products or services, but is limited to 4 instances.
Note: in case of any issues, the best way to reach us is emailing support@acclaimconsulting.com. If you need immediate assistance, call us at 617 871 9250.
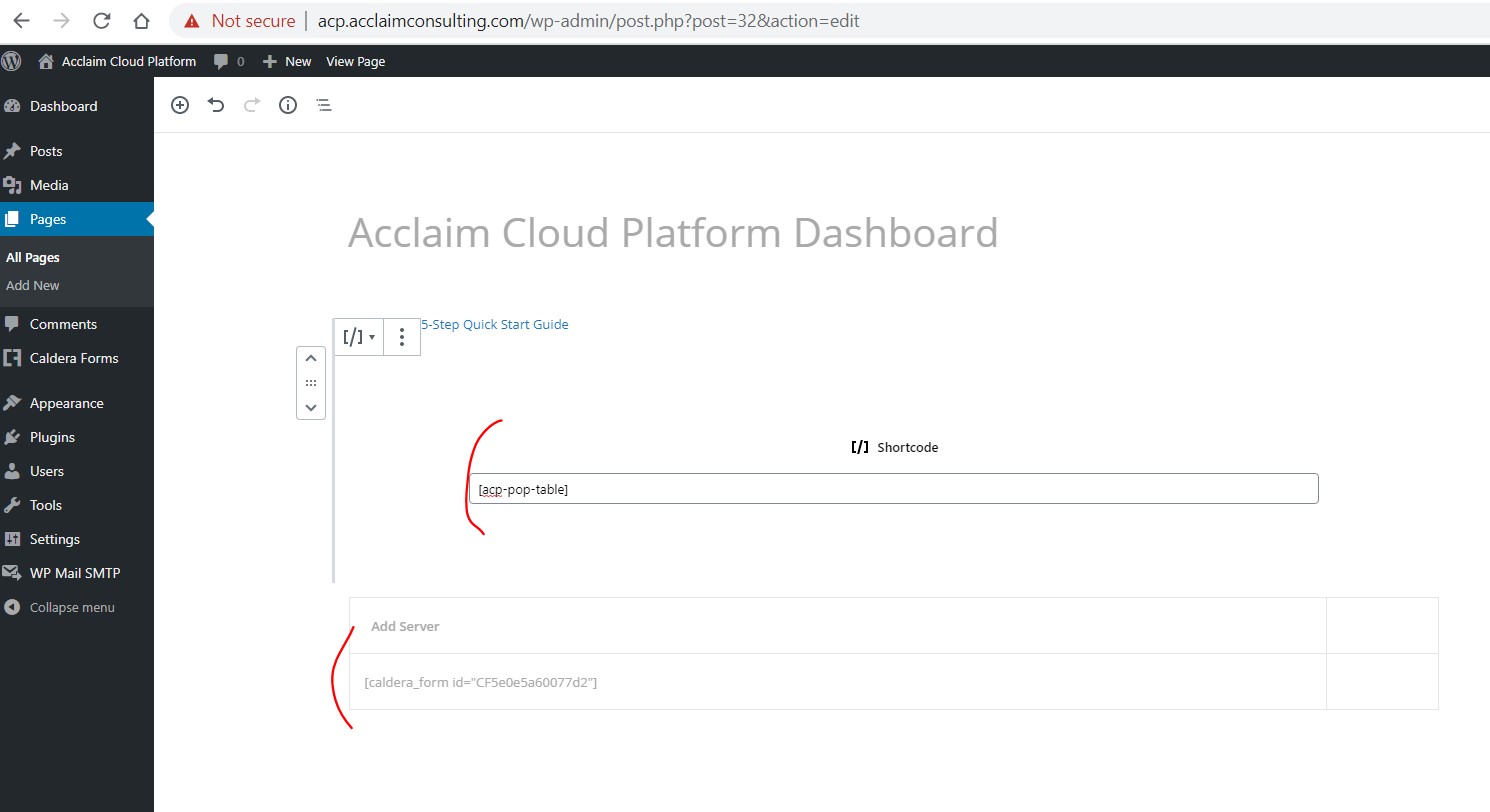
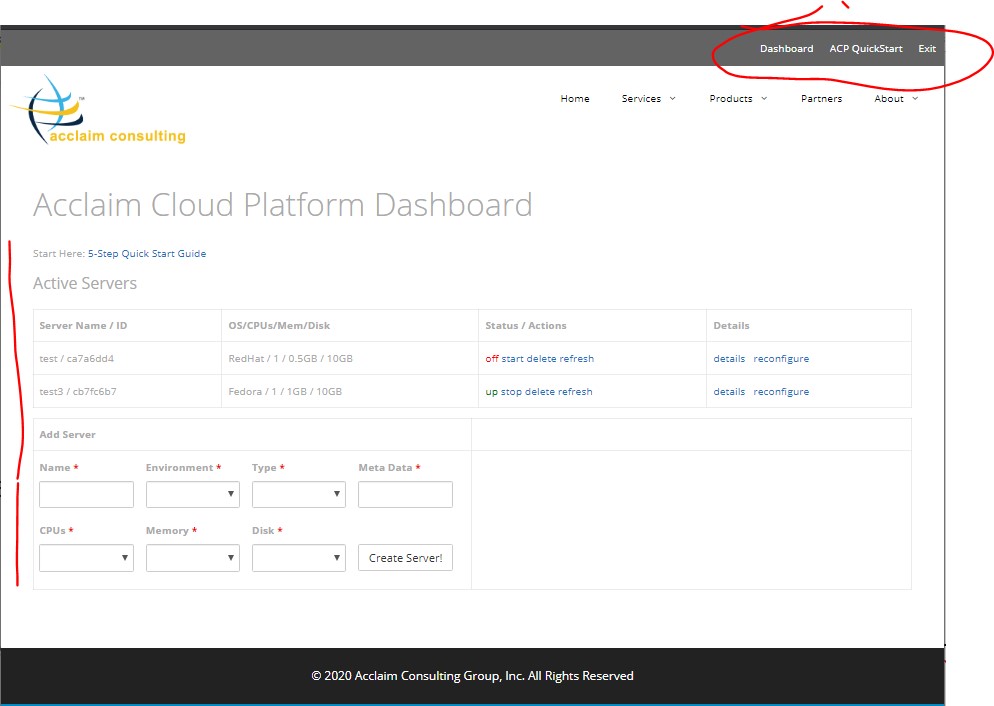
- Dashboard Page
- We first need to copy the Add Server Form Short code under Caldera Forms: Click on ‘Get Shortcode’ then copy it to clipboard.
- Add New Page
- Title: Acclaim Cloud Platform Dashboard
- Add Link to Quickstart Page (just start typing below Title: Note, you may add a block at and point and use the block handle to move it up and down to desired sequence/position)
- Start Here: 5-Step Quick Start Guide
- Add Shortcode
- acp-pop-table <– be sure to enclose with […]
- Add 2 column, 2 row table (by adding block and searching for ‘table’)
- Row 1, Column 1: Add Server
- Row 2, Column 1, Short Code for Add Server Caldera Form
- Update/Publish Form
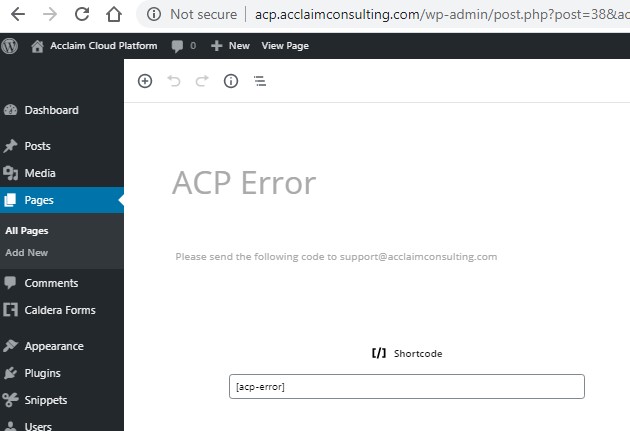
- Error Page
- Title: ACP Error
- Content (user your email support account): Please send the following code to support@acclaimconsulting.com
- Publish Page
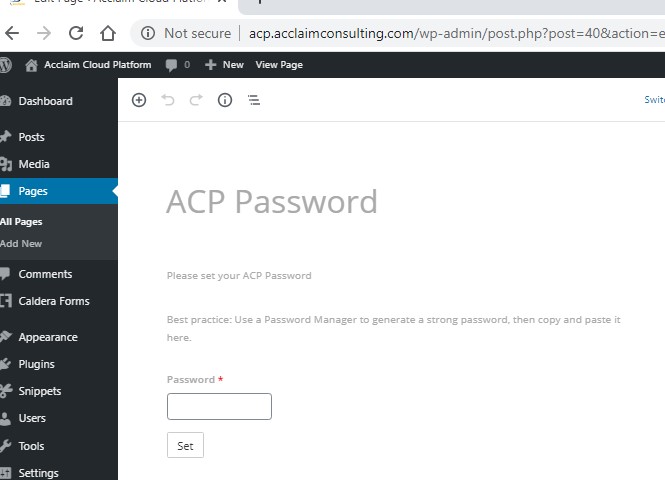
- Set Password Page
- Title: ACP Password
- Content: Best practice: Use a Password Manager to generate a strong password, then copy and paste it here.
- Insert the Caldera Form: Set Password (Add block, search for Caldera Forms, and then select Set Password Form we created earlier)
- Publish Page
Theme Changes
We use GeneratePress – free version. The final look and feel we desire is as follows:
The following menu items are required. The following steps are based customizing GeneratePress theme, but similar steps will work for other themes.
- Edit Theme
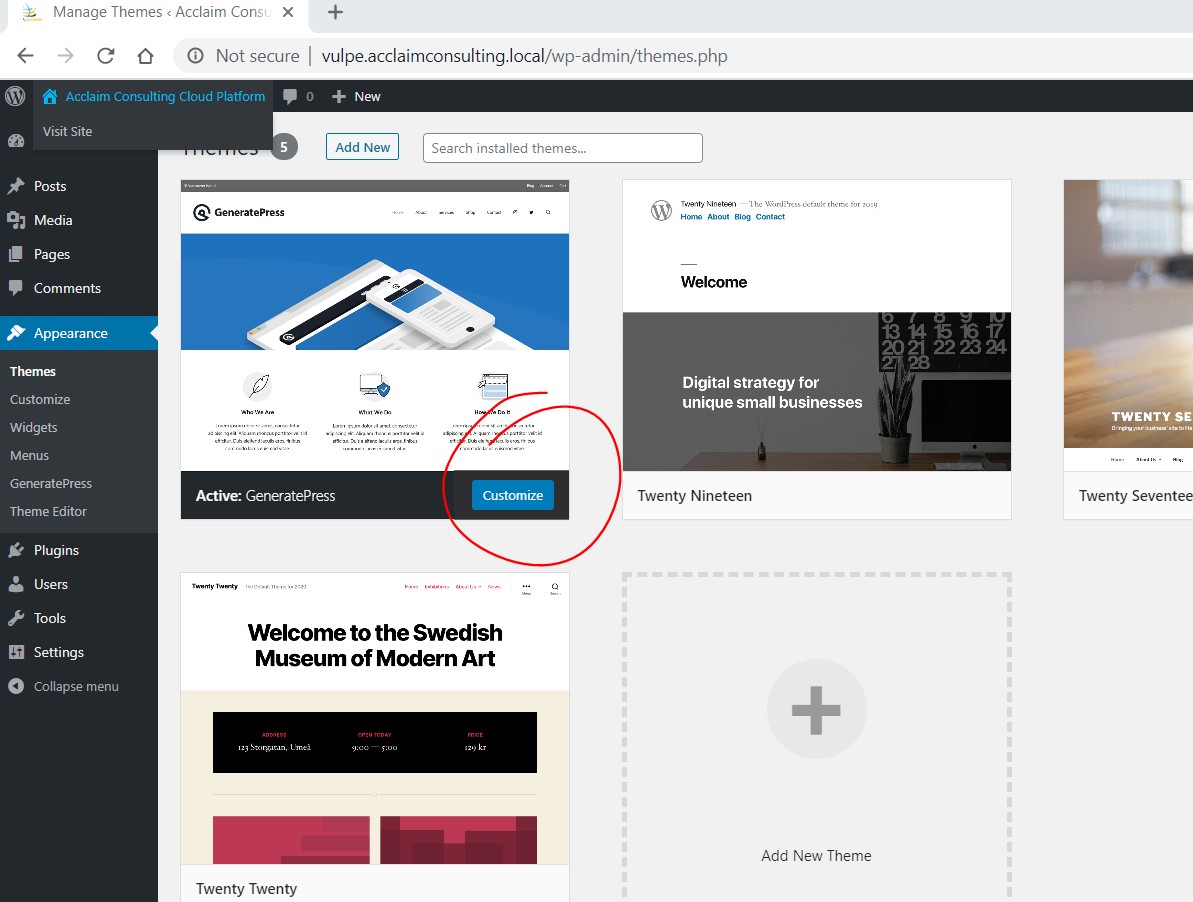
- Select Menu
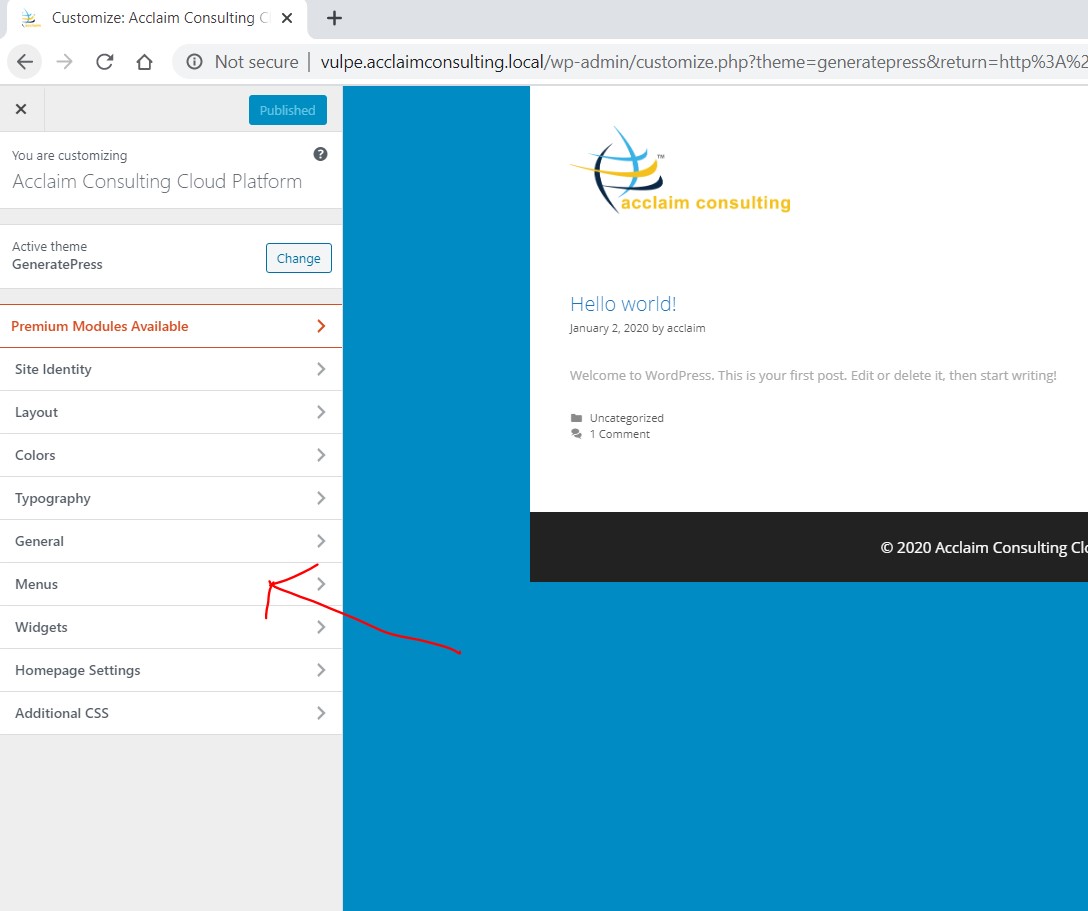
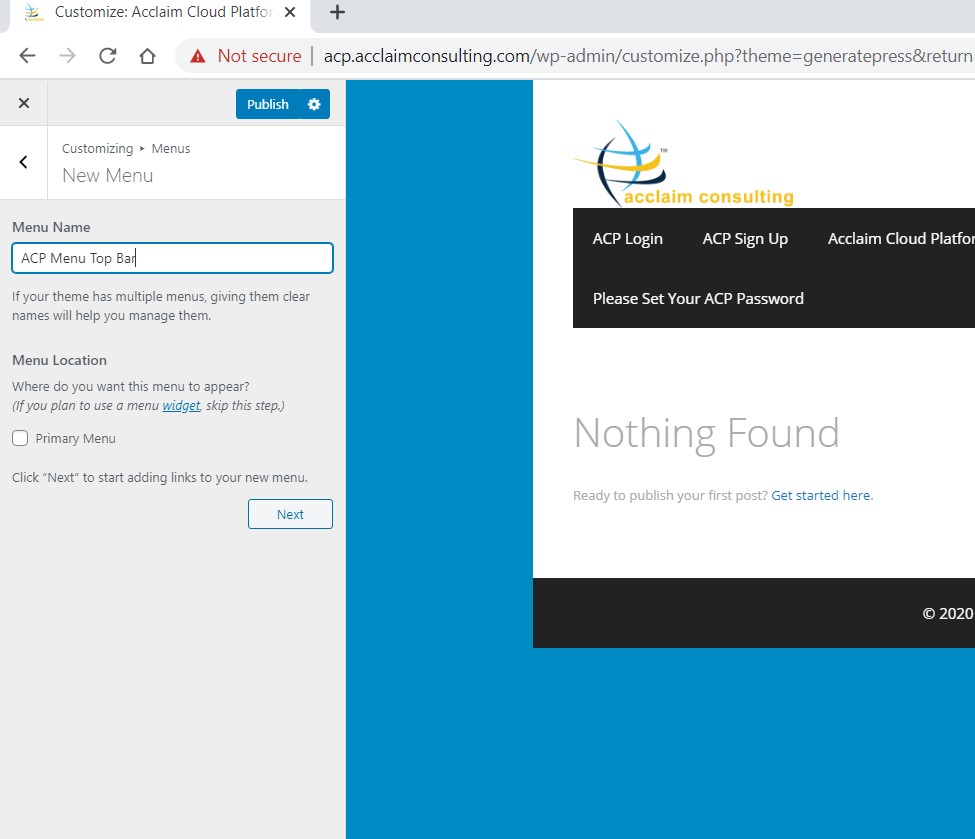
- Create New Menu

- Provide a menu name –
- Typically, this will NOT a primary menu as the ACP is designed to fit into a portal or some larger web site. We therefore leave ‘Primary Menu’ unchecked. It is however checked in the demo included with ACP image as there is no
- Menu Name: ACP Menu Top Bar
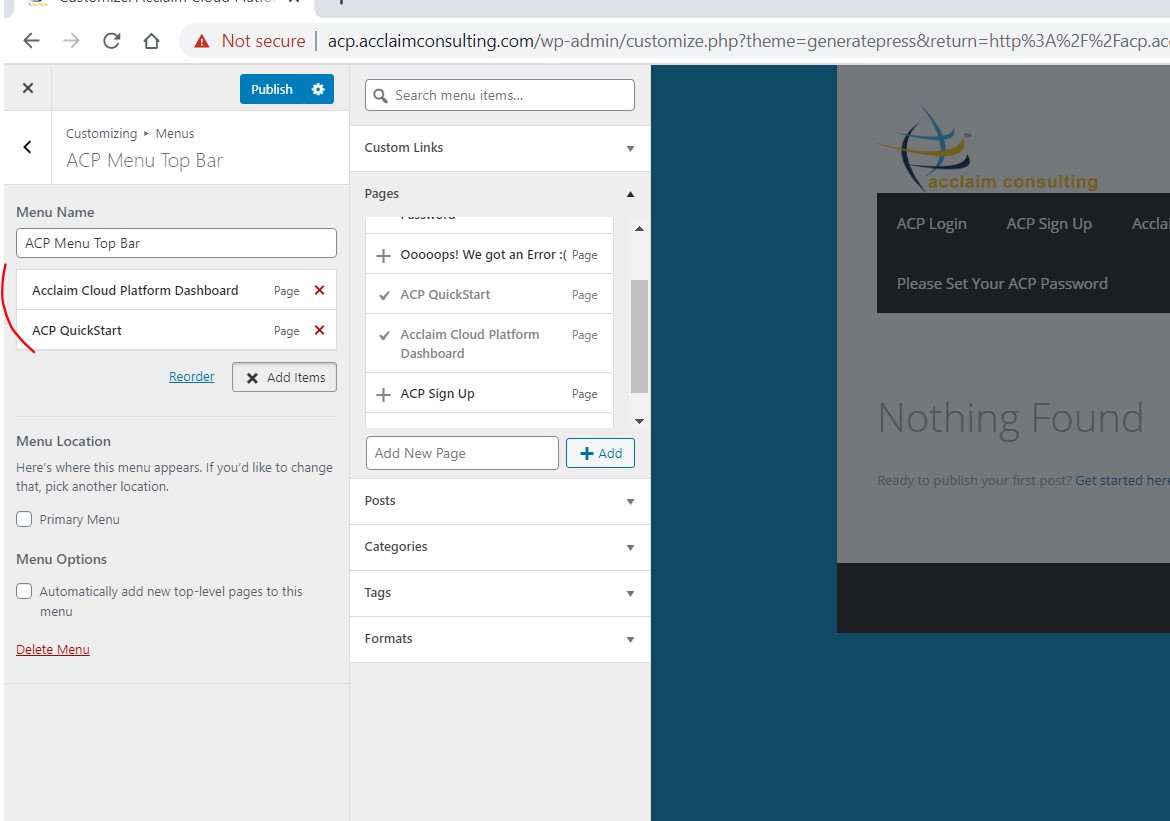
- Click Add Items
- Add Dashboard Page
- Add Quickstart Page
-
- Add Custom Link (This will be manipulated in code)
- URL: /
- Label: Exit
- Add Custom Link (This will be manipulated in code)
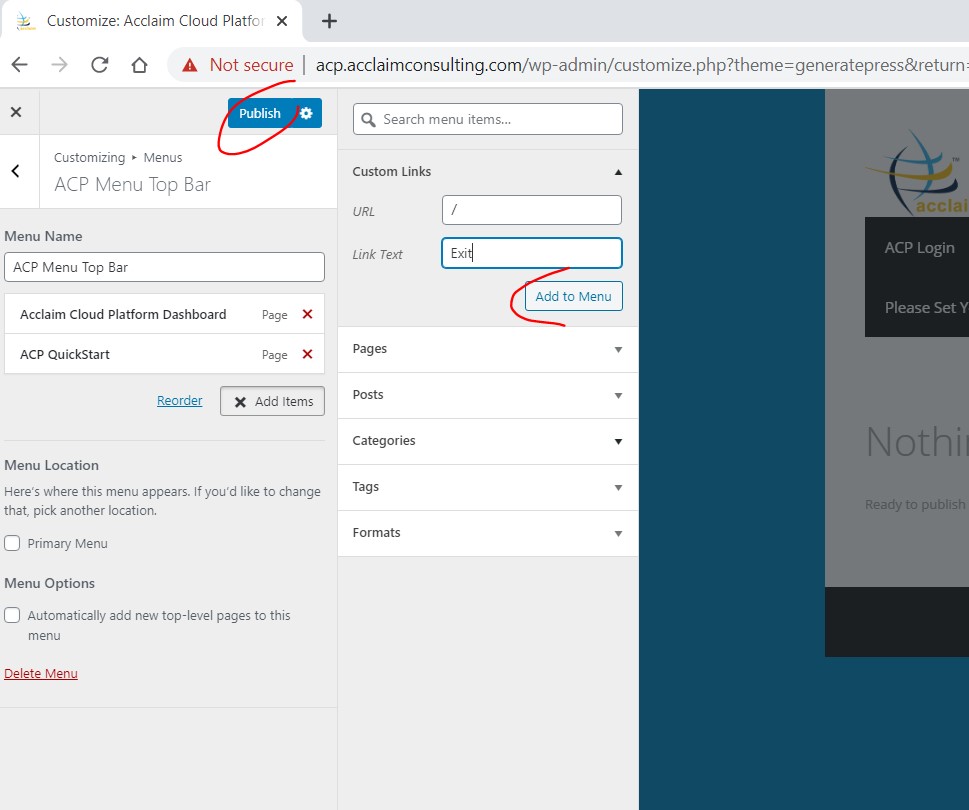
-
- Add to Menu
- Publish